eQual Workbench user guide
Getting started
Requirements
To use eQual Workbench you will need a working instance of eQual (branch dev-2.0). Please refer to this part of the documentation if not.
Installation / Updating
You simply need to init the core package to install workbench on your instance.
./equal.run --do=core_init_package --package=core
Once this done, you may find the Workbench application at the url /workbench or in the /apps page of your eQual instance as follows :
![]()
If you don't see the button, make sure your user is member of the group admin.
Create an eQual application
This part will drive you through all the different tools that eQual gives you to develop your application with a little tutorial.
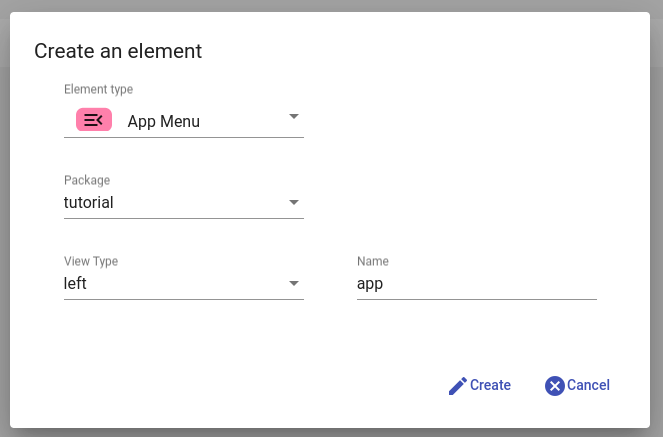
Creating eQual components
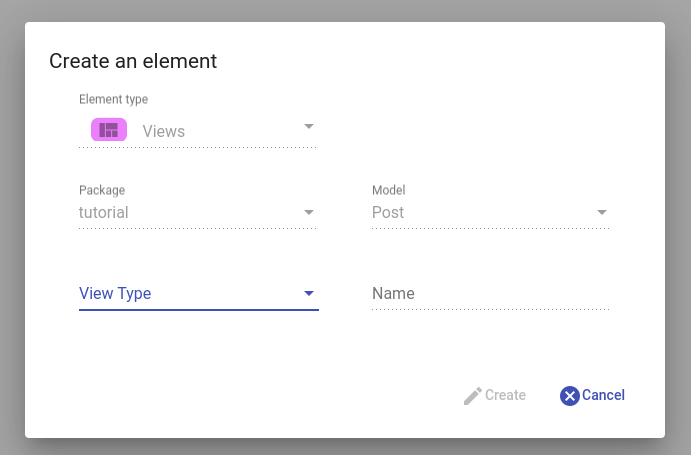
In workbench, you can find the component creator at the bottom left of every component selector of the app.
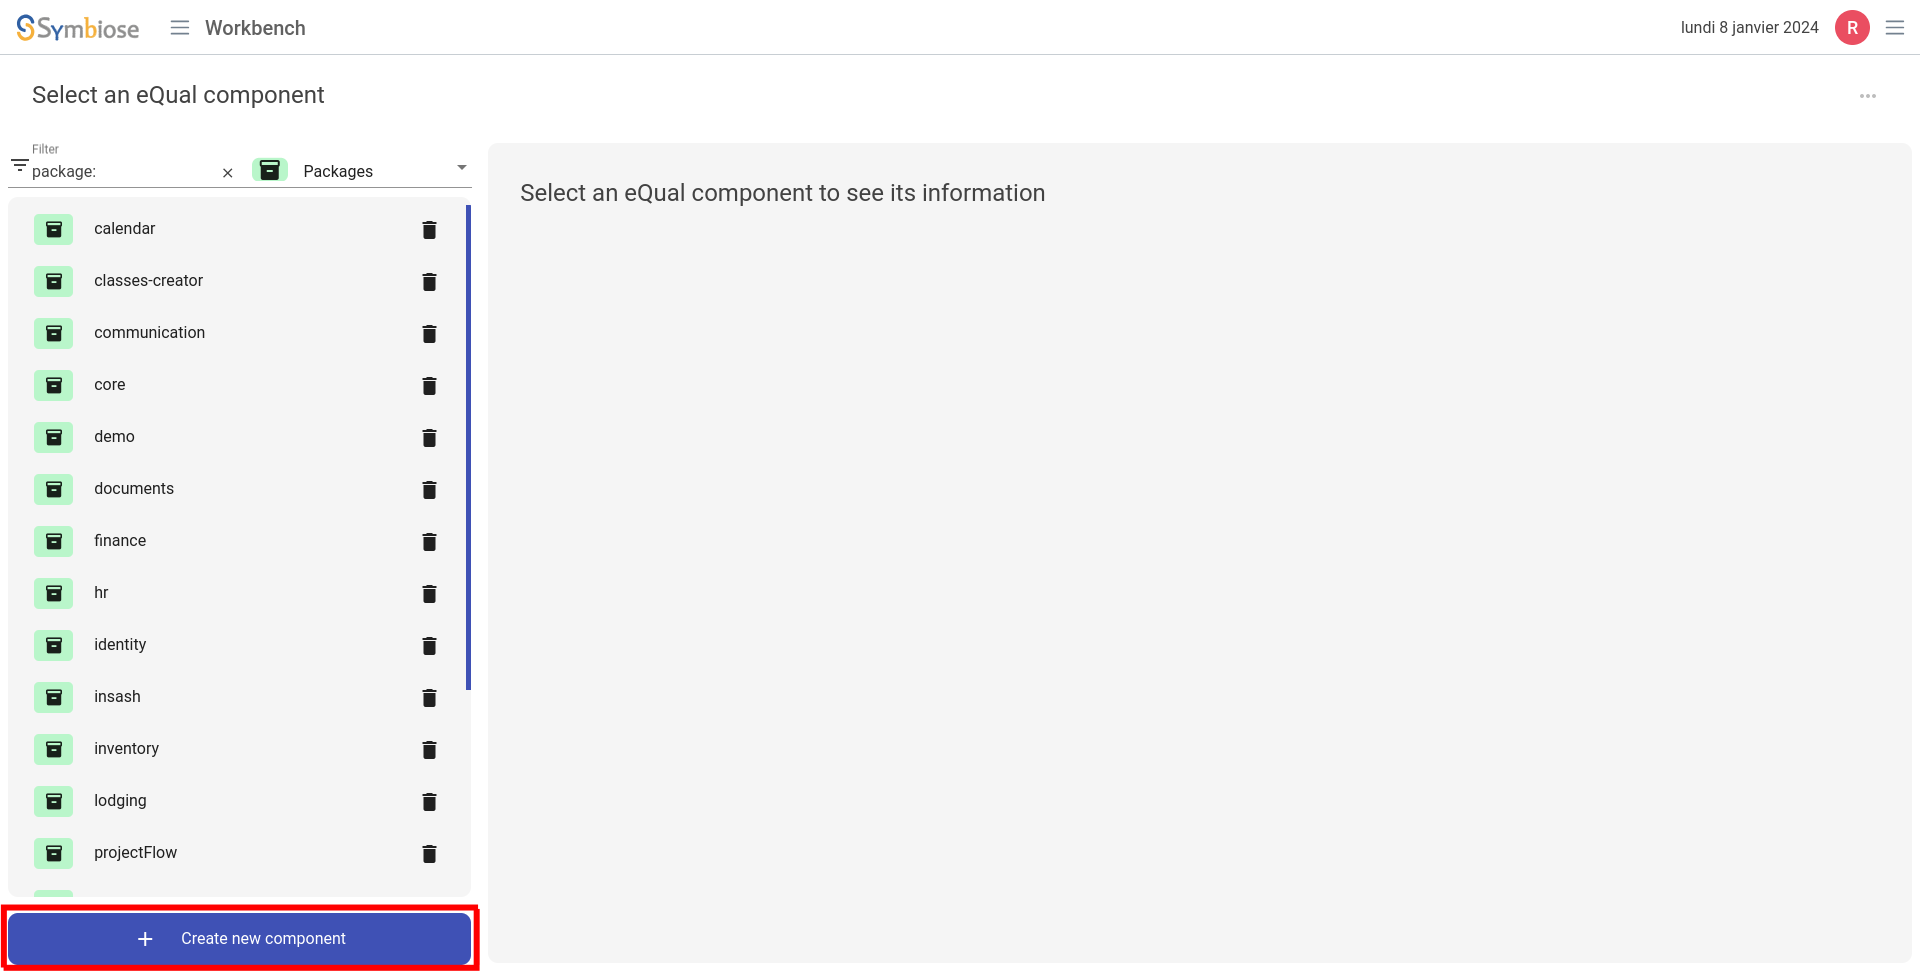
The component creator allows you to create various type of components in eQual using templates to create a working basic component.
The component creator is context aware and will autofill the fields with your current context. You will have to respect the naming convention of each components to be able to create them.
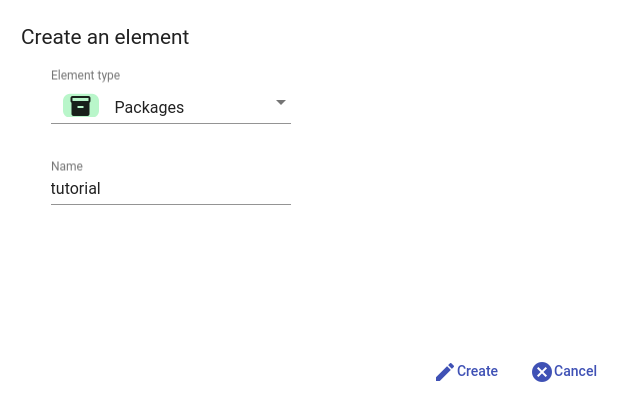
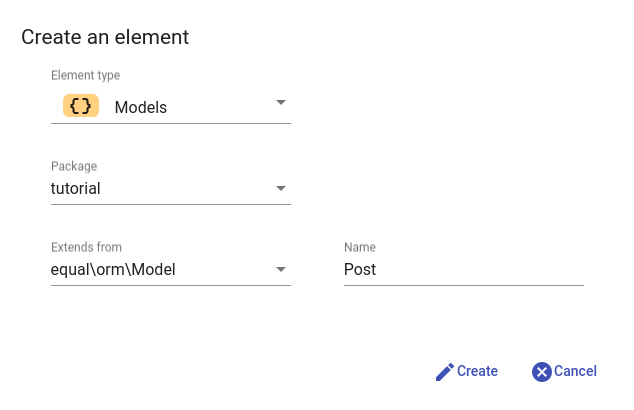
For our tutorial, let's start by creating a package called tutorial and the Model tutorial\Post using the component creator :
Using the base menu to find precise components
You can find precise components in eQual Workbench by using the base menu to search in all the component of the instance :
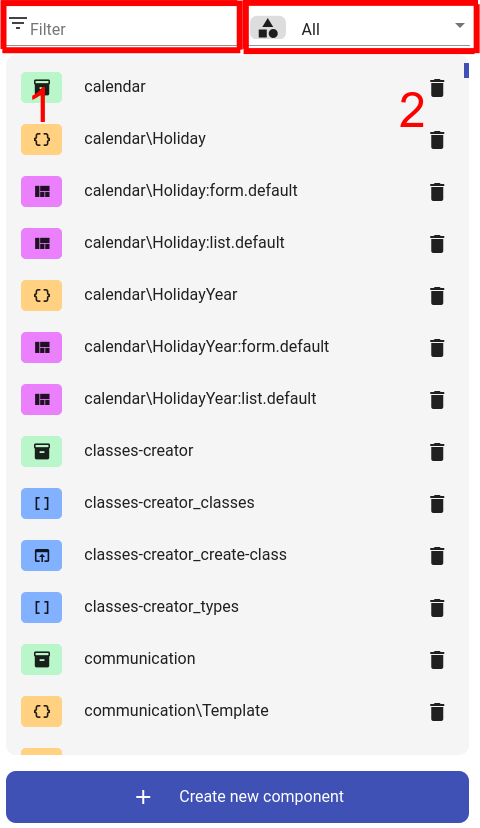
To search for a component, you can use the search bar (1) to filter the component using this syntax :
[component_type]:[package]>[keywords...]
You can also use the drop down menu (2) to select the type (it will change it in the search bar and vice versa).
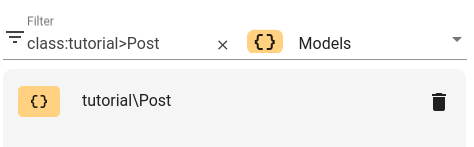
Let's look for our new created Model :
Model's side menu
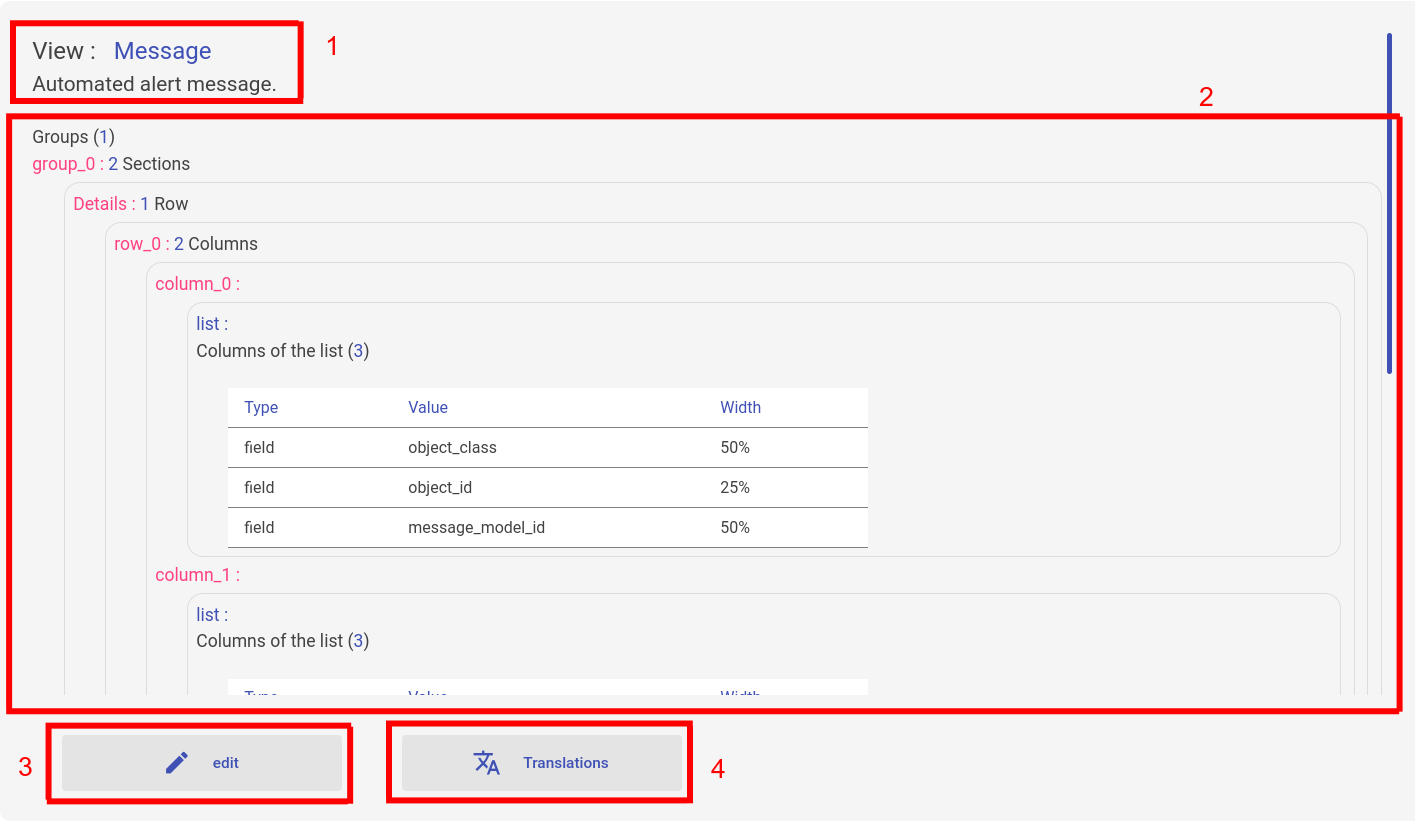
It is now time to take a look to our model. By clicking on it in the component list, the right side of the screen will render the model's side menu :
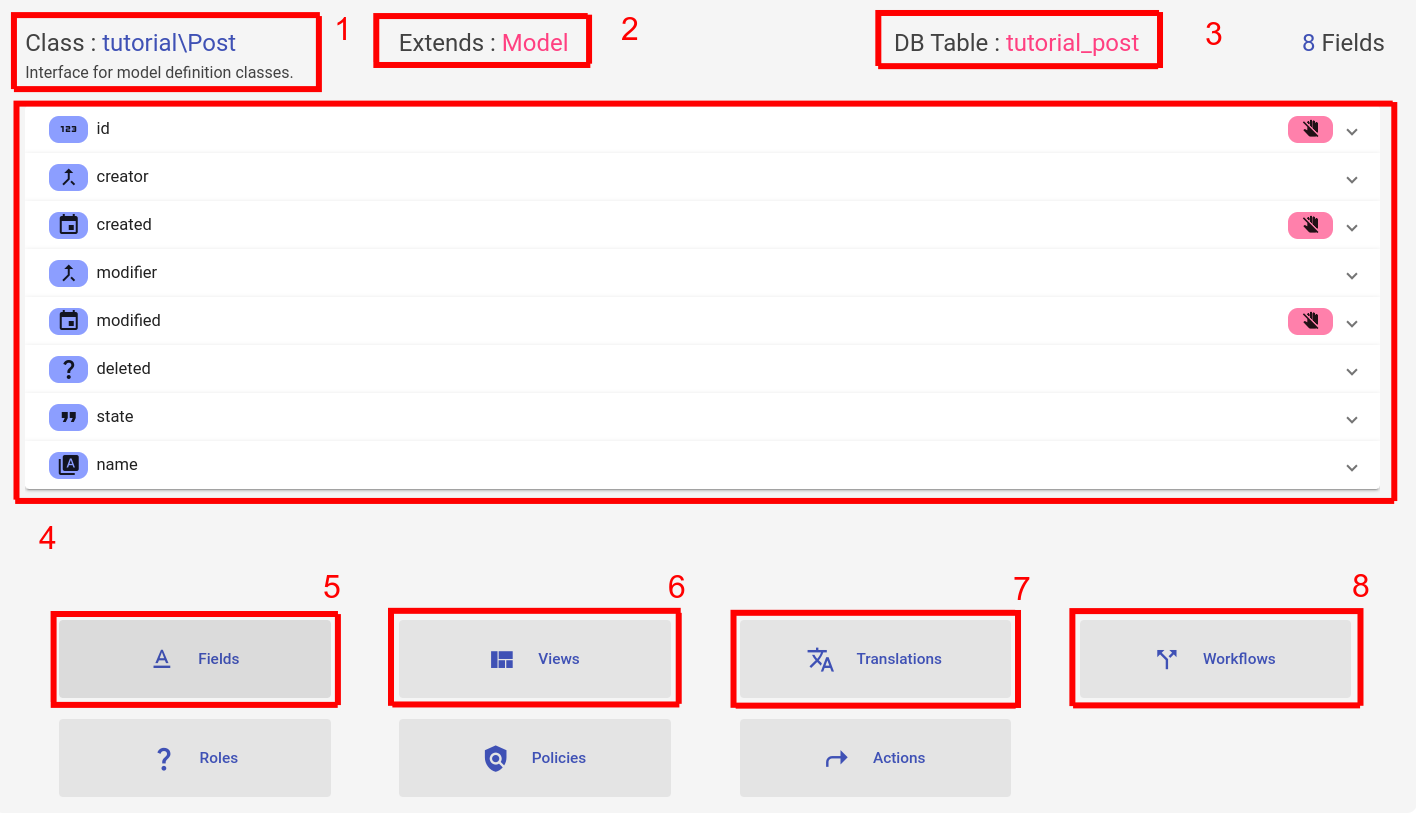
This side menu give a lot of information about the Model :
- Name and description of the Model.
- The parent Model of the current Model (
Modelrefers toequal\orm\Modelthe base Model of eQual). - The table name where object of this Model are or will be stored in the database.
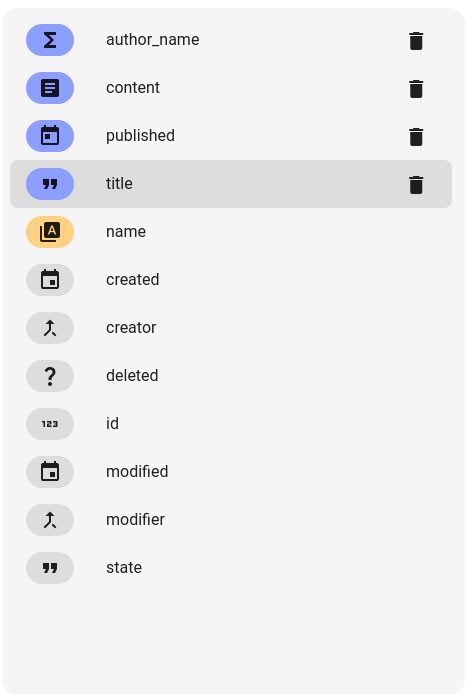
- The list of the fields of the Model (the tabs expand to give more information about the specific field).
Then, there are buttons to interact with the Model :
- Leads to the field editor of the Model see
- Leads to the submenu of the views of the Model see
- Leads to the translations editor of the Model see
- Leads to the workflow editor of the Model see
The other buttons are Work in progress currently.
Model field edition
After clicking on (5) on the model side menu, here we are in the model field editor :

Header
You can see that the header has slightly changed. It is the same in all the different page of Workbench but have variation based on the possible interaction with the current page. Here we have :
- Back button : allows to go back to the previous context (last page in the state you quit it)
- cancel/redo : allows to cancel and redo actions as
CTRL+ZandCTRL+Ydo. - save : allows you sync your changes with the files of the instance of eQual
- more : here are custom actions depending on the tool you are using. Here, you have the ability to show the JSON that will be turned into the PHP code during the save.
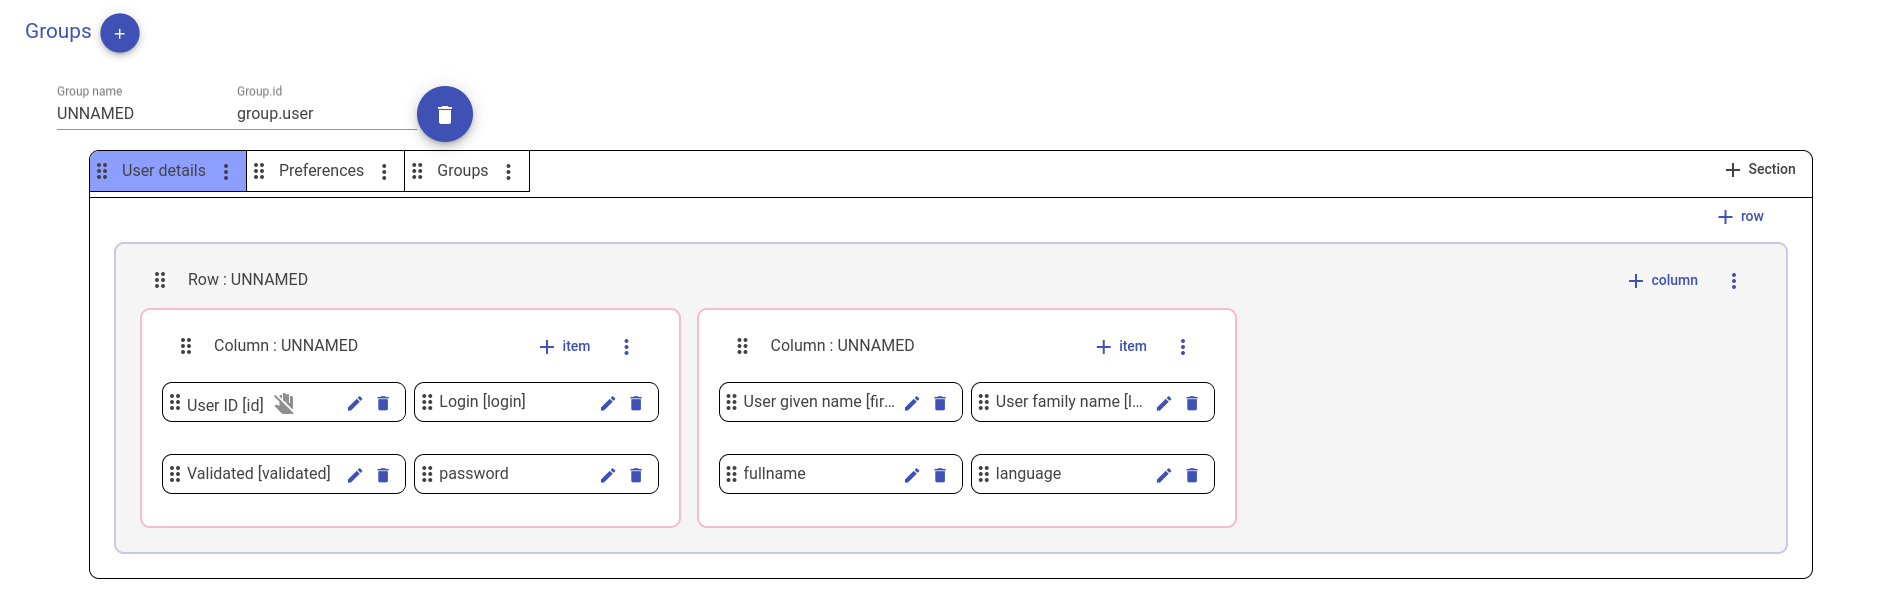
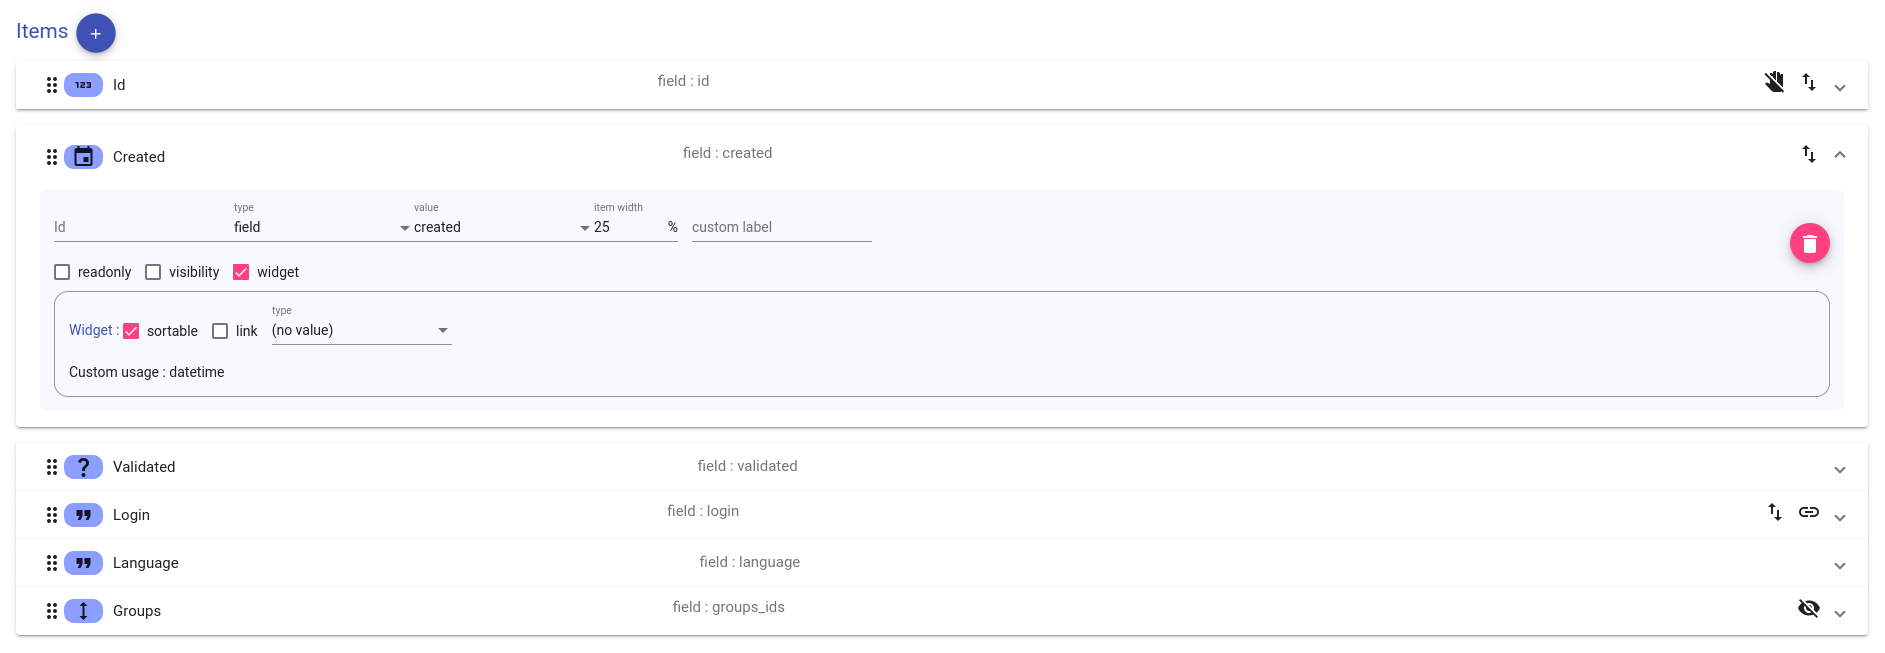
Field list
On the left of the screen you can see the list of the field (5) of the edited Model.
The icon on the left of the name (6) gives two information about the field :
- The icon represent the type of the field :
| Icon | type | Icon | type | Icon | type |
|---|---|---|---|---|---|
| string | date | binary | |||
| integer | datetime | many2many | |||
| array | time | alias | |||
| float | text | one2many | |||
| boolean | many2one | computed |
- The background color represents the state of the field :
- Gray is inherited from
equal\orm\Model. It can't be edited or deleted because it is required by eQual to manage it in DB - Yellow is inherited. You can't delete an inherited field.
- Green is Overridden. It's an inherited field that has been edited in this Model. It cannot be deleted but can be reset to its parent value
- Blue is basic field, neither inherited, neither overridden.
- Gray is inherited from
As in the component menu, the field creator (7) is located at the bottom left of the screen. If you do not fill the name input, it will give an arbitrary name to the field.
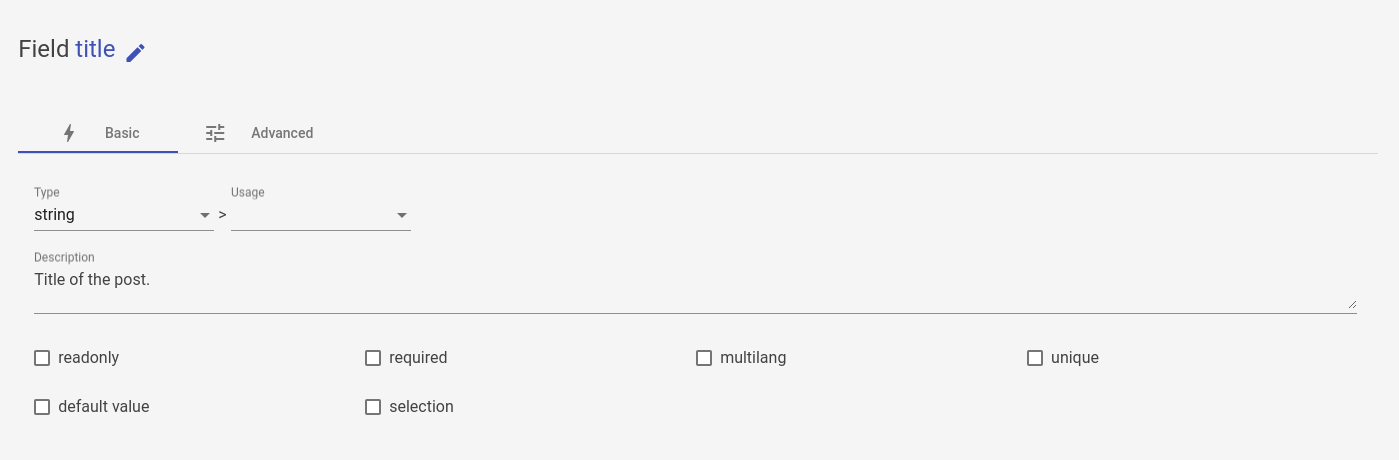
Edition pane
On the right of the screen, when a field is selected, you have the ability to edit it.
you can edit the name of the field directly at the position 8 only if the field is not inherited.
The properties of the class are split in two parts (9). You will find the more used option in the basic tab. These options (10) are bound to the type of the field, workbench will allow you to edit only the properties that applies to the current selected type.
tutorial
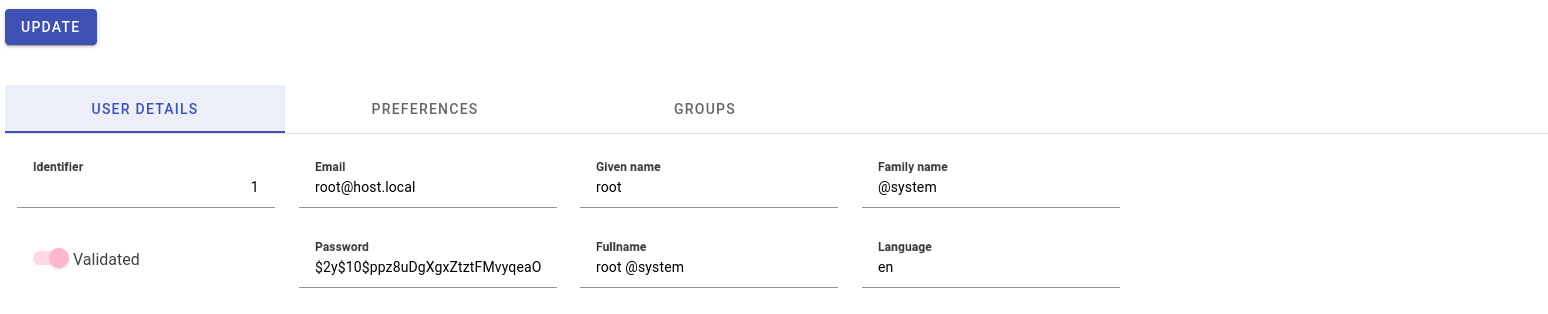
Let's add properties to our Post Model :
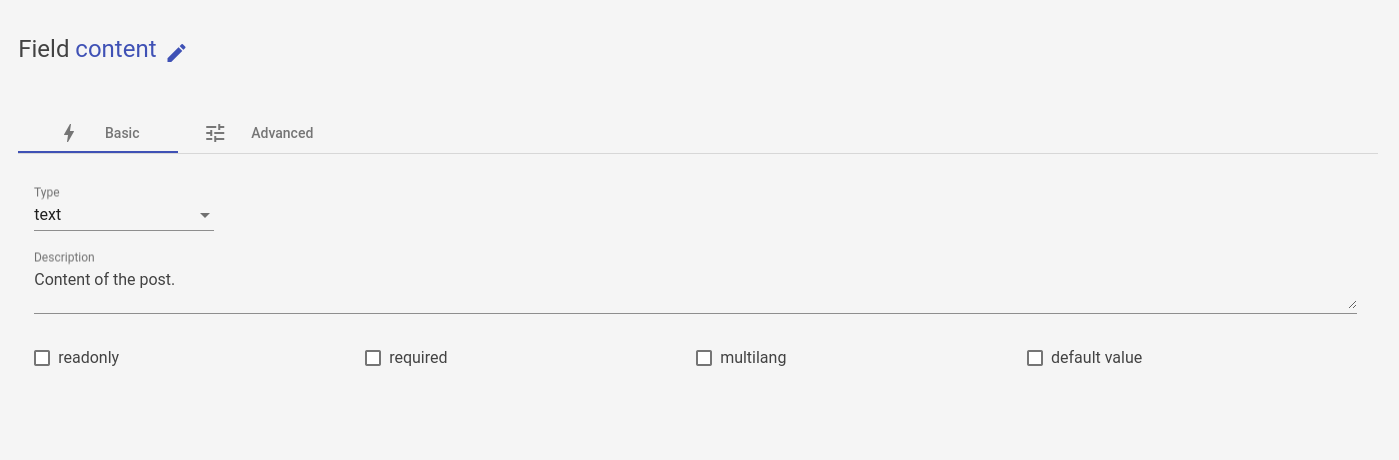
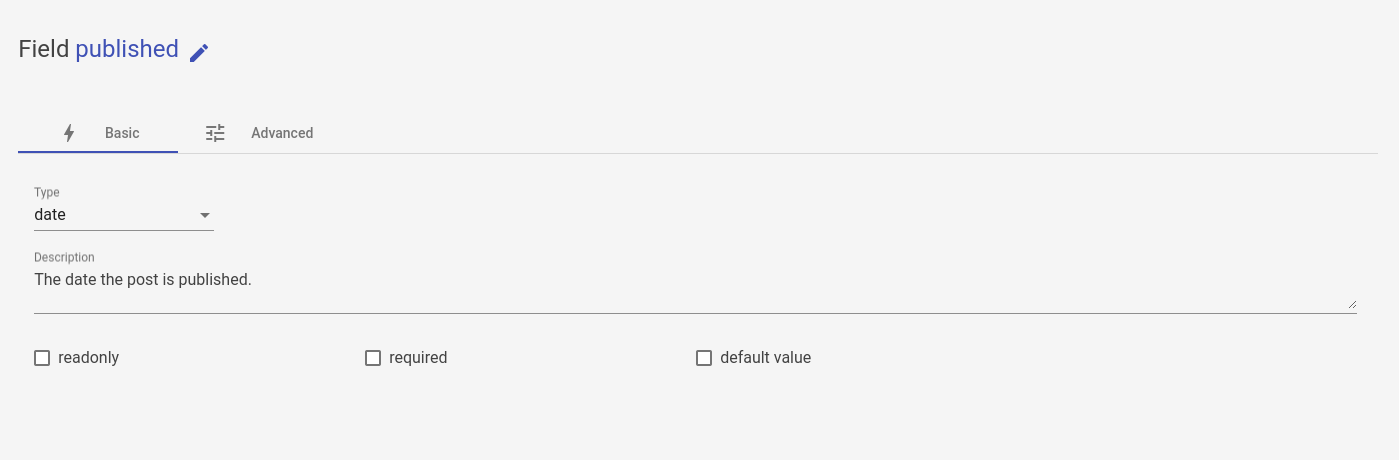
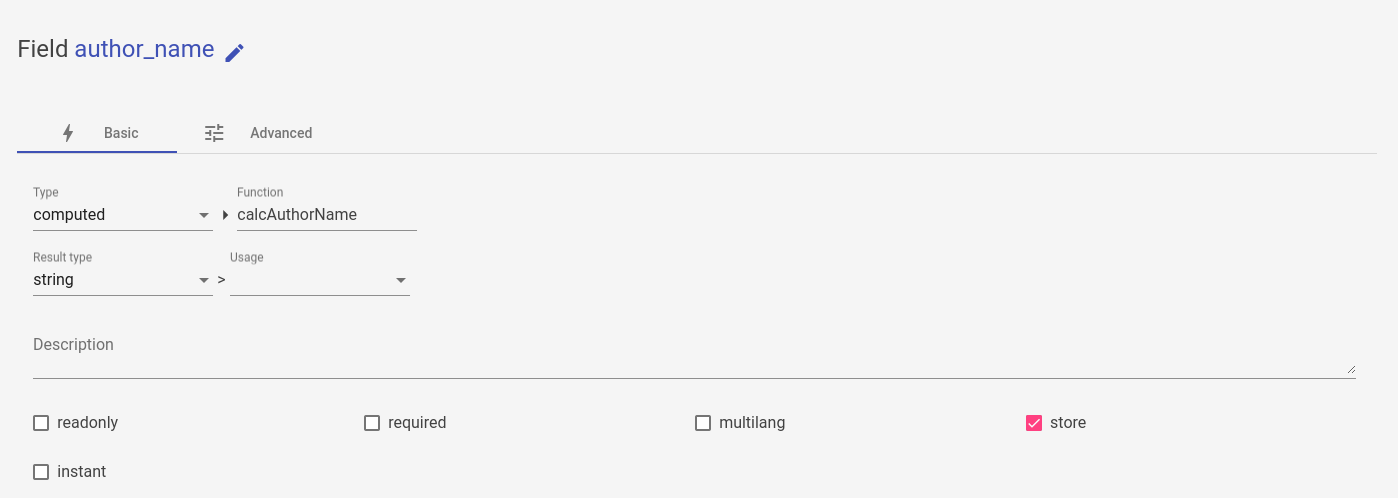
If you have these fields at the end you can save the model.
You will need to add the function for the computed in the php file to make it work, Workbench does not allow logic edition for now.
<?php

public static function calcAuthorName($self){
    $result = [];
    $posts = $self->read(['id', 'creator' => ['fullname']]);
    foreach($posts as $id => $post) {
        $result[$id] = $post['creator']['fullname'];
    };
    return $result;
}
Translate a component
By using the button translation in the Model side menu or Controller side menu, You can access the translation editor.

In the translation editor, you can select or create a lang to translate your entity (1).
The format for the lang is ISO 639-1, either two lower case letter (representing a language) like fr or en or two lower case letter (representing a language) and two upper case letter (representing a country) separated by an underscore like fr_BE or es_EC.
Translating en entity means to translate its fields (or parameters name for controller), but also its views and error (due to constraints in models or exception in controllers)
Model translation
We will speak about model translation in this part but this also apply to controller, using params as their fields.
![]()
You can translate the name and description of the model and add plural variation to be used in the view render motor of eQualUI (1).
Translating fields (3), will allow your apps to display the name differently in the views depending on the lang of the user that visualizes it. It also override the label argument of a view field. You can choose whether or not a field is translated or not by checking the box (2).
View translation
There is not much to translate in the view because the name of the fields are already translated in the Model translation. You will be able to translate groups,sections,row,column and label fields names.
![]()
You can select which view to translate with the tab selector (1), then you can translate the view the same way you translate the model (2)
Error translation
Error translation works differently. you need to precise for each field and error type the appropriate message.
![]()
First you can choose if a field has error to translate by checking the active box (1)
Then, you can add error type to the field (2) and translate them.
tutorial
Let's translate our Model Post in english.
![]()
Creating a workflow
By using the button workflow in the Model side menu, You can access the workflow editor :
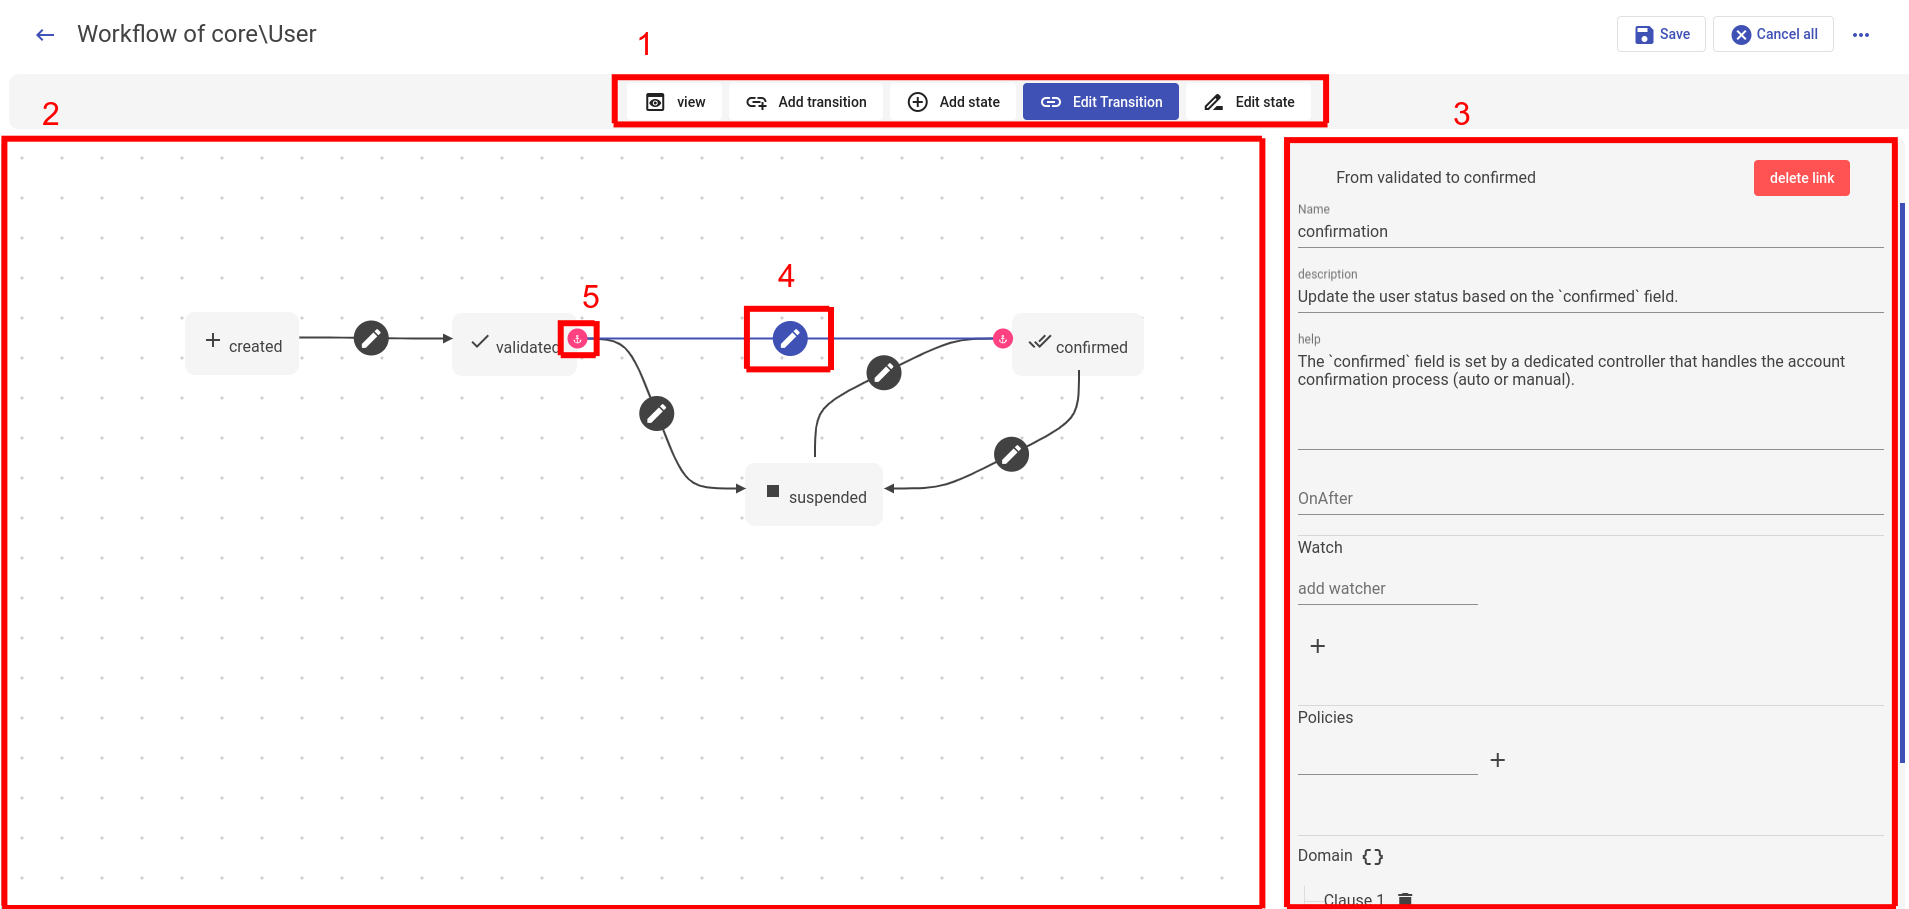
To create or edit a workflow, you can use the different modes (1) of the editor.
When in view or edit state, you can move the states of the workflow to adjust the visualization (2) by drag and dropping the state.
If you want to edit properties of states or transition select the appropriate mode and click on the edit button (4) of the item you want to edit, then use the contextual menu on the right (3) to alter the element.
When in create or edit transition mode, you can use the anchors (5) to move the start and the end of the transitions to adjust both the workflow and its visualization.
On save, the workflow will be converted to php associative array in the Model php file and the layout you created in core\Meta to be reused next time you want to visualize or edit the workflow.
tutorial
Let's create a workflow for Post. Set the name and icons as follows

submenus
By using the button view in the Model side menu or the button model,controller or view in the package side menu, You can access the component submenus. Here is an example with the view submenu.
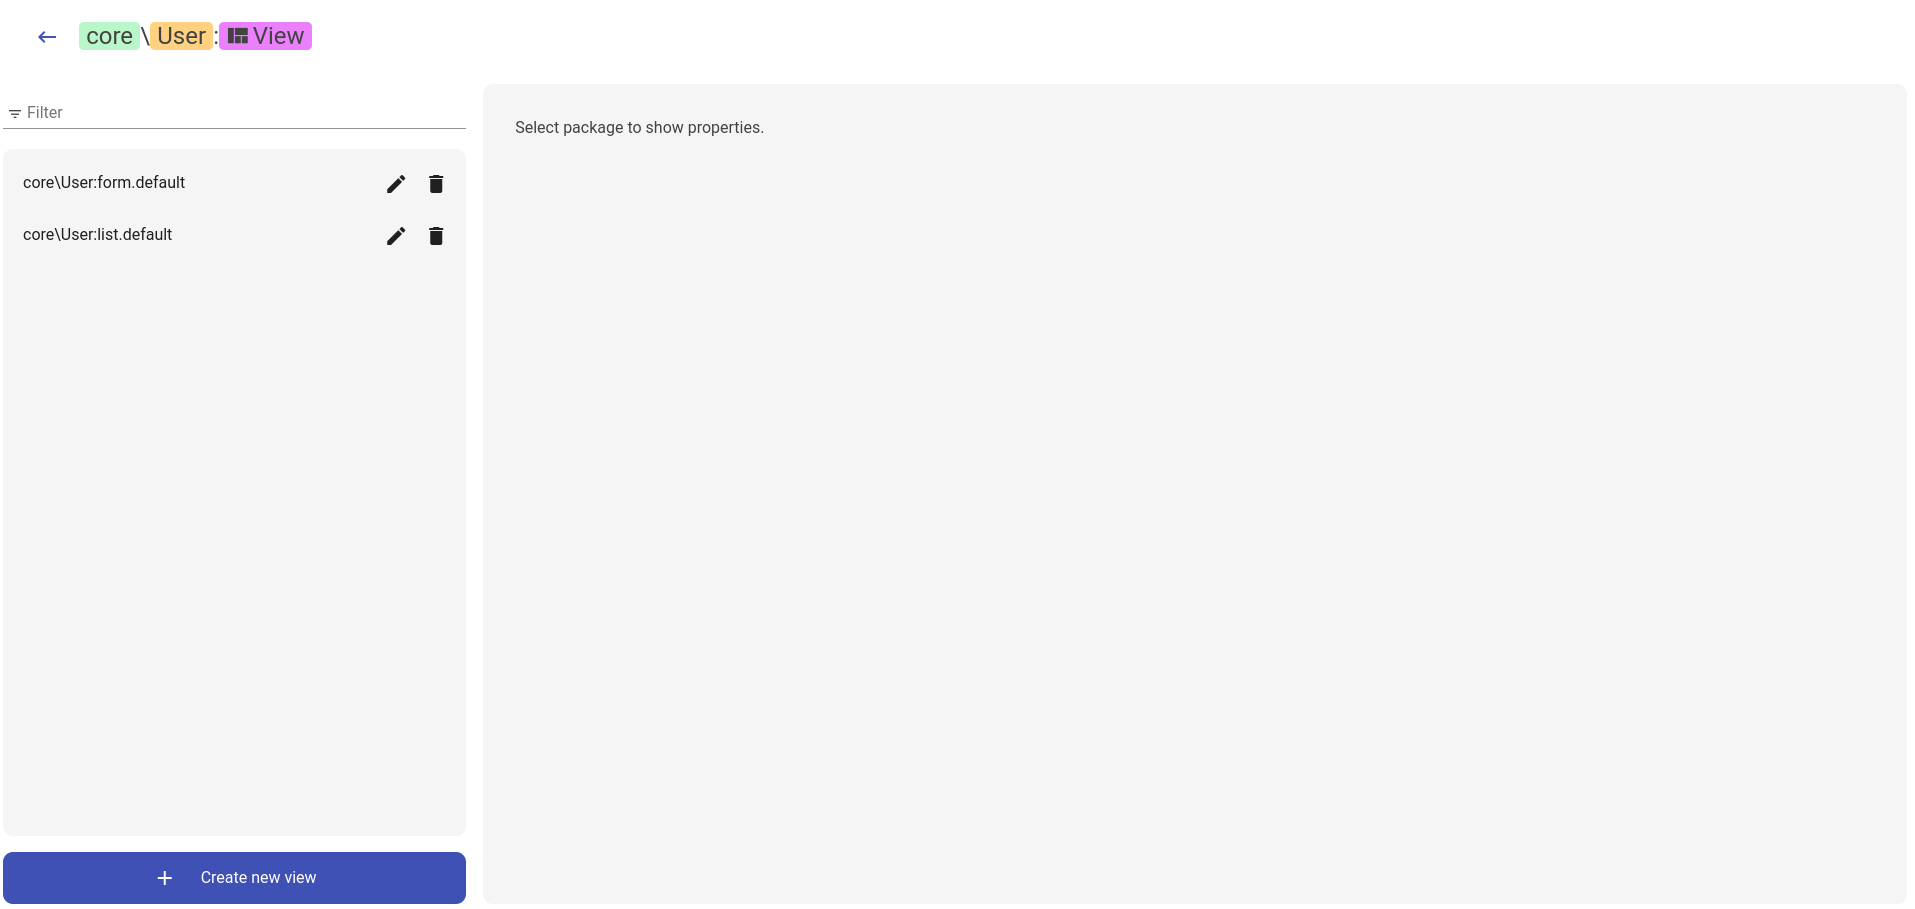
Submenus uses the same layout as the main menu but only display components of the package or view of the Model
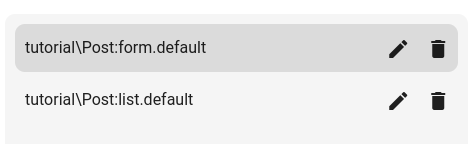
tutorial
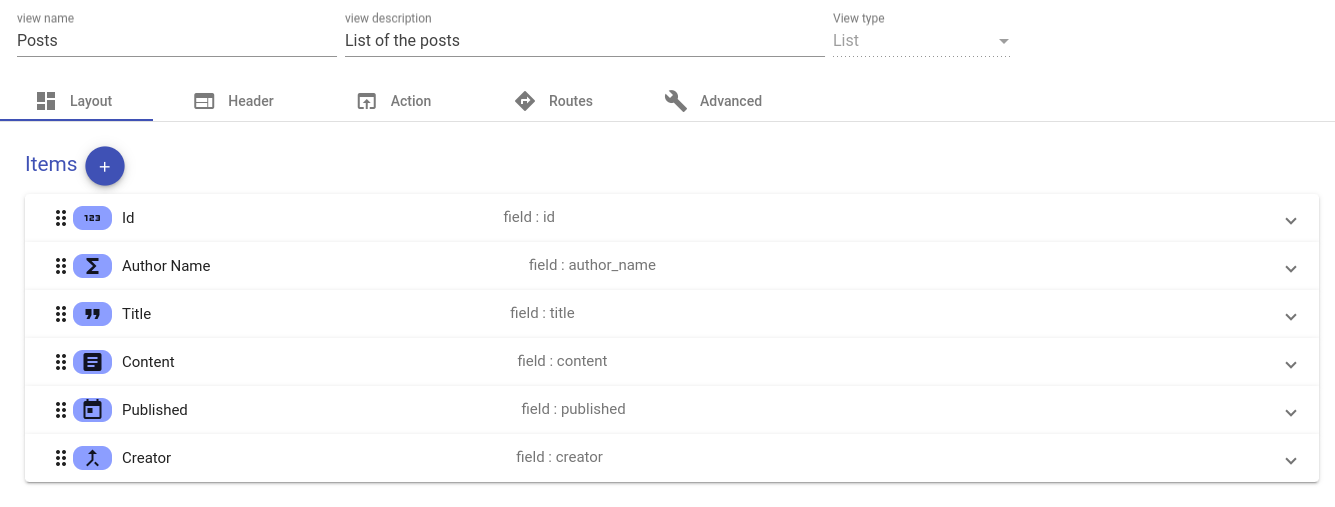
Let's create two views for Post using the view submenu : form.default and list.default (the basic view of a model). By clicking on the component creator you can notice that the context is autofilled into the fields
You should end up with :
View side menu
The view side menu give information about the selected view and access to its edition.
- name and the description of the view
- Information about the layout of the view
- Leads to the view editor see
- Leads to the translation of the Model/controller associated to the view see
Editing Views
View are huge JSON file that are hard to read. Workbench give the user a simpler way to edit the view using an interface that mimic the result of the view in eQualUI

In the editor, view are segmented in 5 categories (2). The content of these part may vary depending on the type of view you are editing.
- Layout : This is the part that vary the most. The layout is the part of the view that will display the object of a Model.
- Header : Refers to the header part of a view. You can edit header actions and selection actions in this tab.
- Actions : You can edit the custom actions of the view here
- Routes : You can edit the routes of the contextual menu of the view here
- Advanced : You can edit all the other properties of the view here such as the domain, the collect controller, the operations, ...
Form/Search view layout
When you are editing the layout of a form or a search view, the editor will create a render that looks like the render of eQual UI.
You can edit the layout visually using drag and drop.
List view layout
The view layout is represented as a list of column in the editor. You can edit the column and change their order by dragging and dropping them
tutorial
Edit the views of post like that :
form.default :
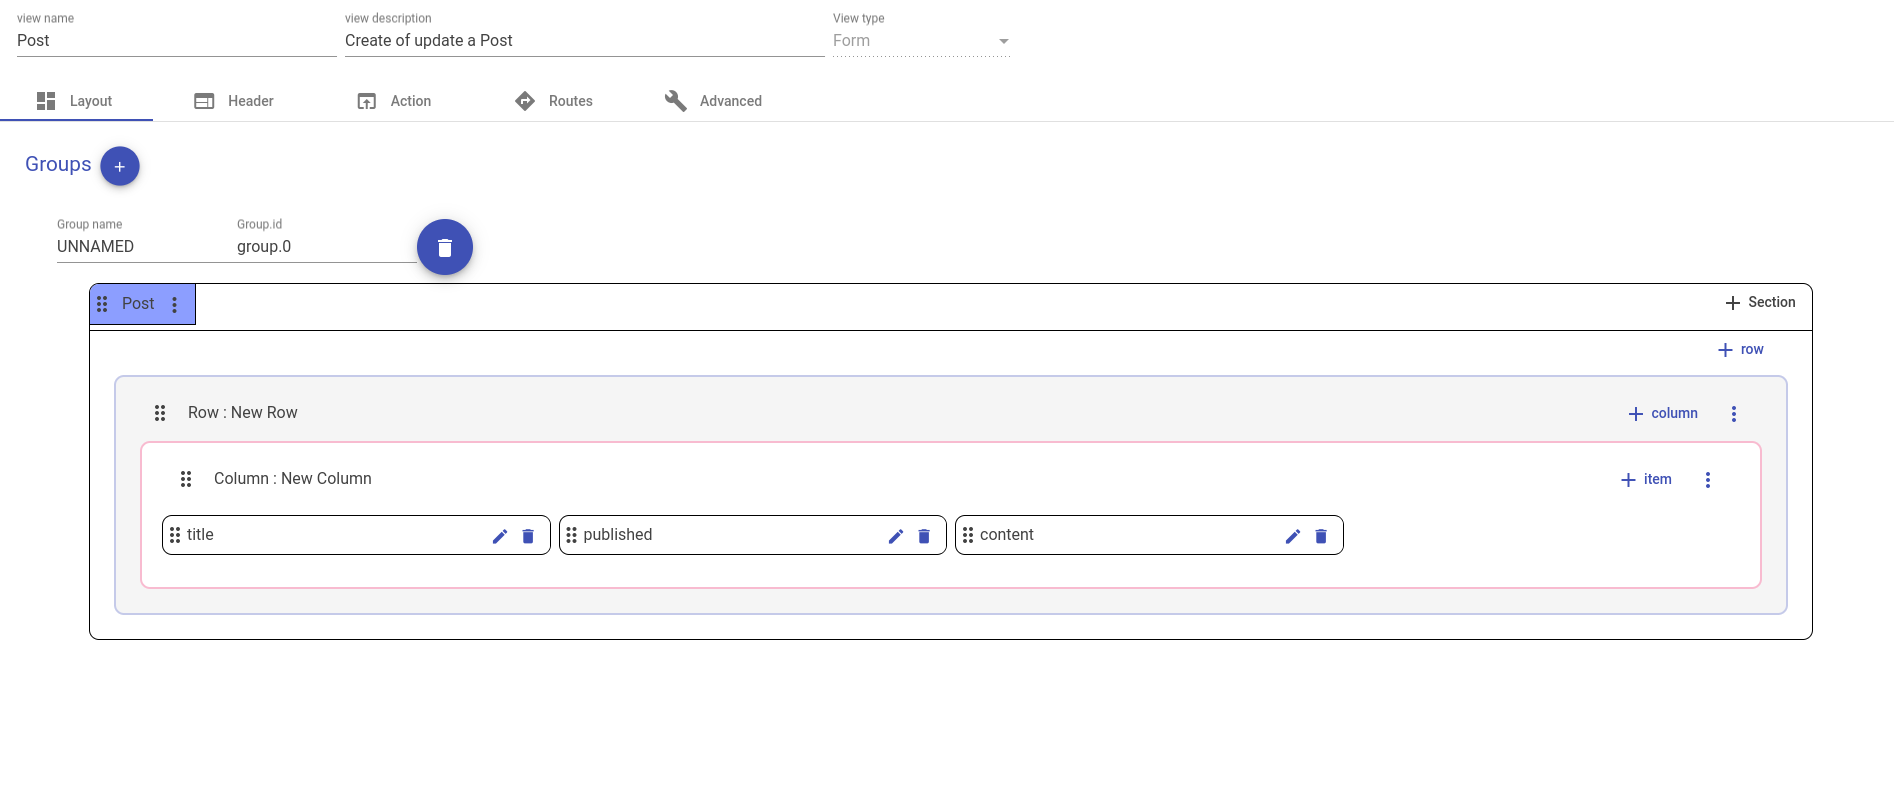
Items have a width of 25%
list.default :
controller side menu
The controller side menu give information about the selected controller using the announcer of the controller, allows the user to call the controller for testing purpose and give access to parameter and return value edition and controller traduction edition.
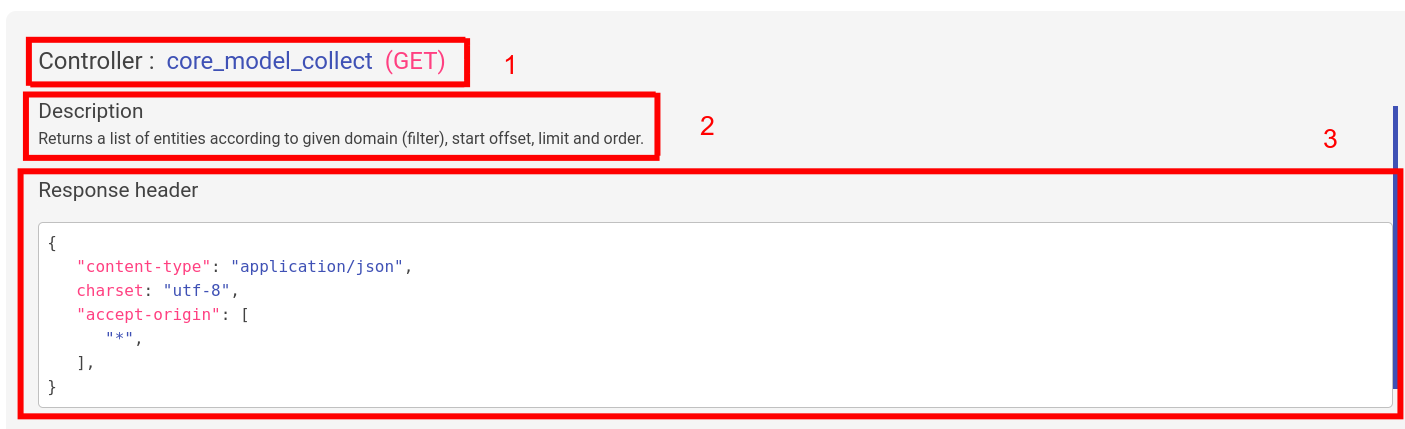
- Name and type (GET = data controller or DO = action controller) of the controller.
- Description of the controller.
- Response header : Meta data about the response you will get by calling this controller.
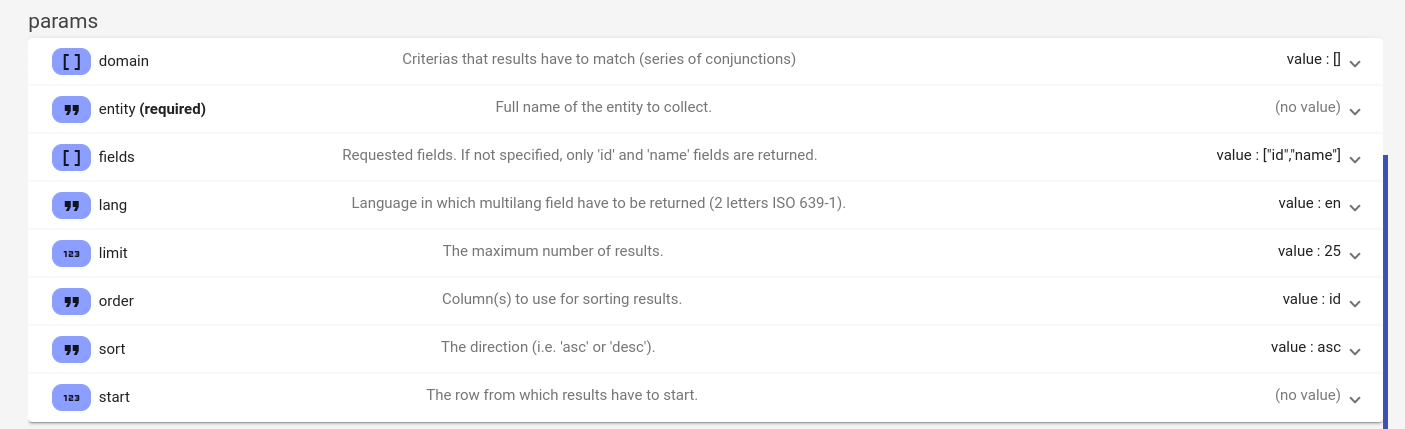
This list represents input parameters of the controller and can be filled to call the controller in workbench or generate cli command and http request to call the controller.
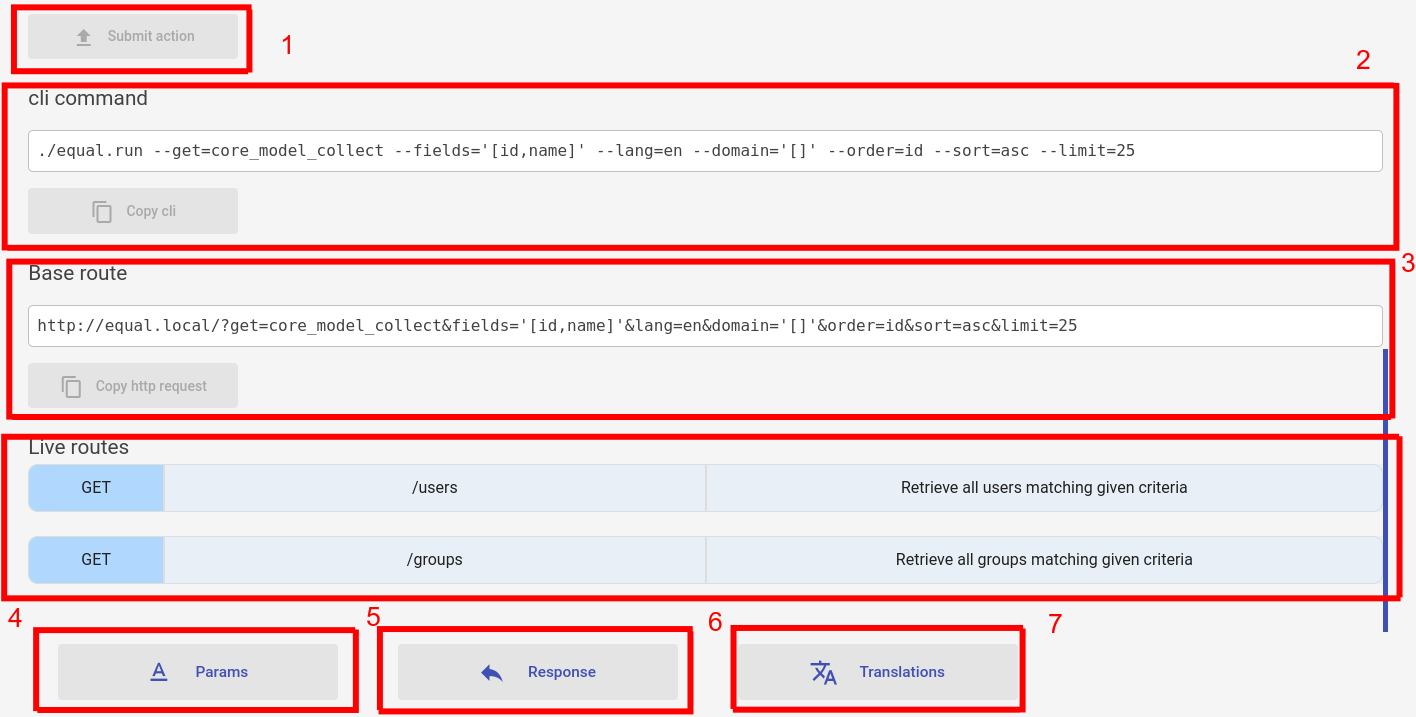
- Allows you to call the controller in workbench and see its response if all the required input parameter have a value.
- Allows you to copy the cli command to call the controller with the parameter you entered in workbench.
- Allows you to copy the http request to call the controller with the parameter you entered in workbench.
- Give you all the custom routes enabled in the instance that uses this controller.
- Leads to the input parameters editor see
- Leads to the response editor see
- Leads to the translation editor of the controller see
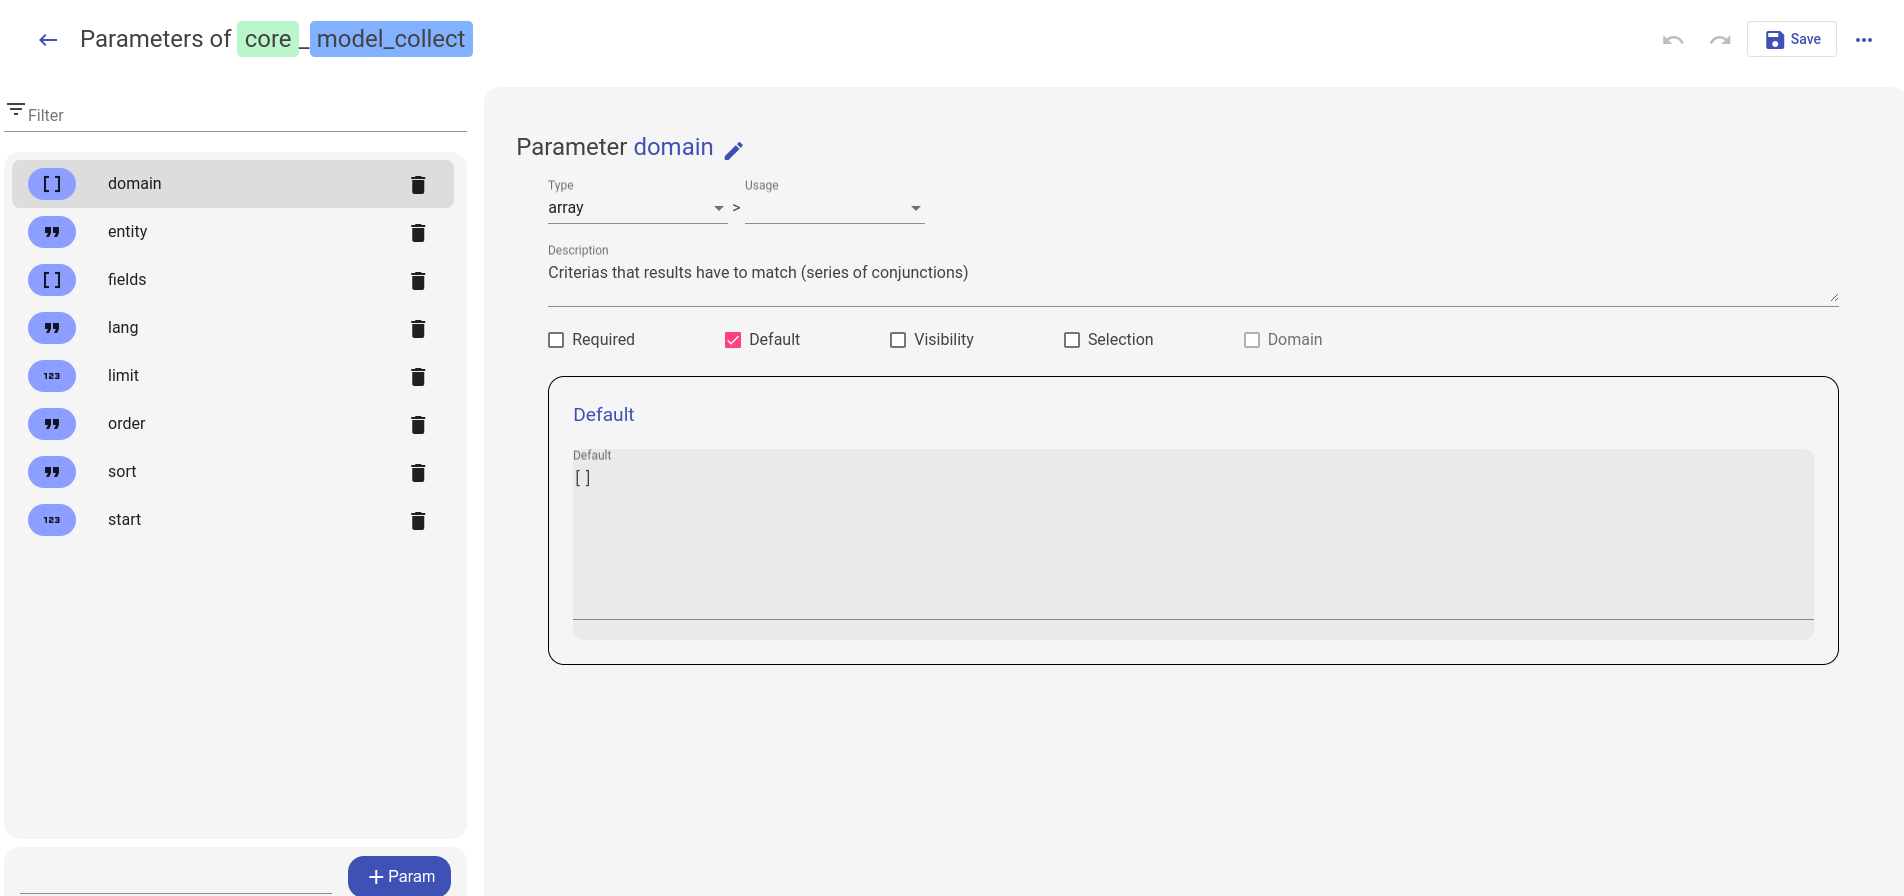
Editing controller parameters
The controller parameters editor works exactly like the model field editor without the inheritance handling and the advance panel.
Editing controller response type
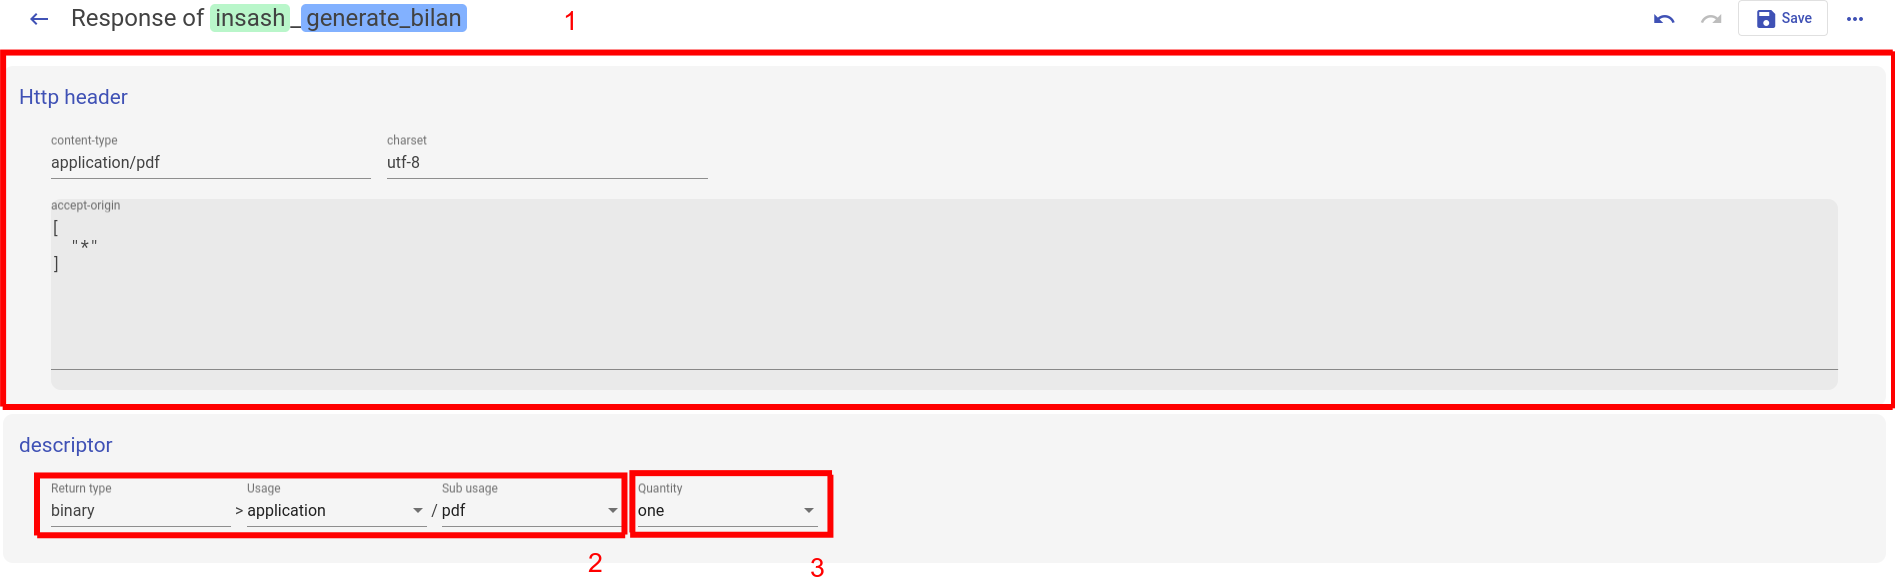
In the return editor, you can modify the http response header (1), and the eQual type of the content of the body (2).
Http response header indicates in which format the data is sent, the descriptor is an indication about the type of the content.
For example an array can be sent in XML format : content-type : application/XML and descriptor : array But can also be sent in json format : content-type : application/json and descriptor : array.
You can also precise the quantity (one or many) of variable you send (3)
In addition of the "classic" types of eQual you can indicate an "entity" type that allow you to reference an eQual Model, or a data of type "any" : type "any" can be precise as a composite structure of eQual types if possible

Menu side menu
The menu side menu is in work in progress and only give access to the menu editor (1) and menu traduction editor (2)
Edit Menus
The menu editor allows you to create/edit/delete menu items whilst having a preview of the final result.
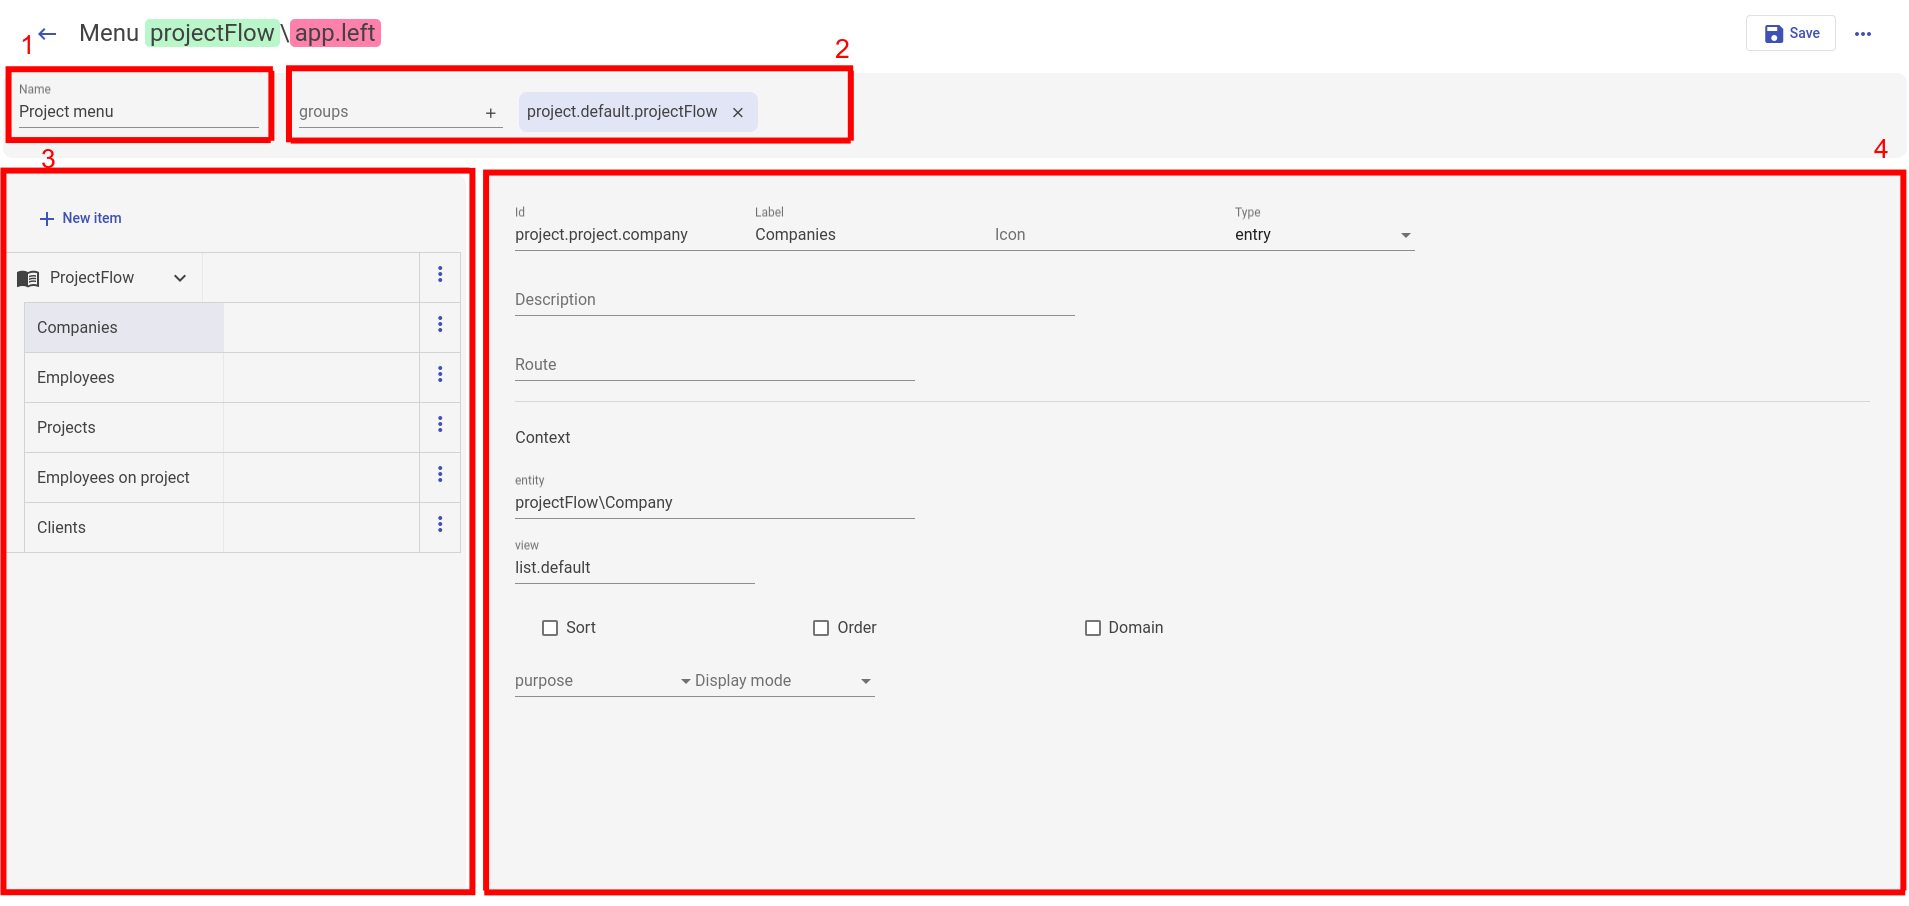
- Name of the view for display purpose only (unrelated to its id which is attached to its filename).
- Manage access to the menu by group
- Preview and item selector (allow sorting by drag and drop on the same level)
- Edition of the properties of the selected menu item
All the editable properties of the view in workbench are properties findable in the original menu structure.
tutorial
Let's create a menu of type left and of name app in the package tutorial
Then, open the menu editor and edit the menu like so :
Package side menu
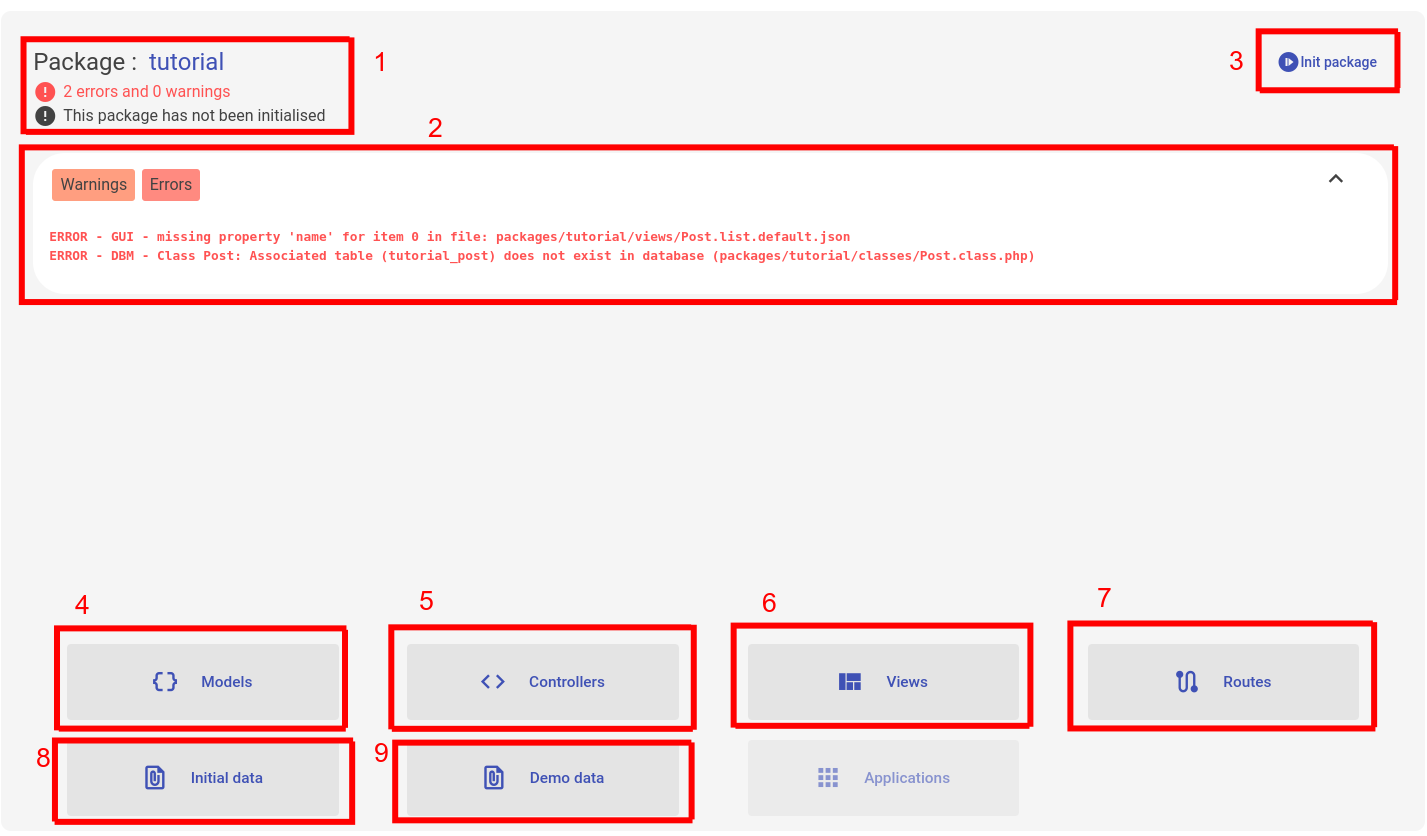
- information about the package : name,
package_consistencyreports and if the package has been initialized on the eQual instance. - The details about the
package_consistencyreports. - Button to open the package initializer dialog.
- Leads to models submenu
- Leads to controllers submenu
- Leads to views submenu
- Leads to routes submenu
- Leads to init data editor see
- Leads to demo data editor see
Create initial/demo data
Demo and initial data are the same structure but they are not saved at the same place to allow the developer to choose which he wants to import if he wants to import them
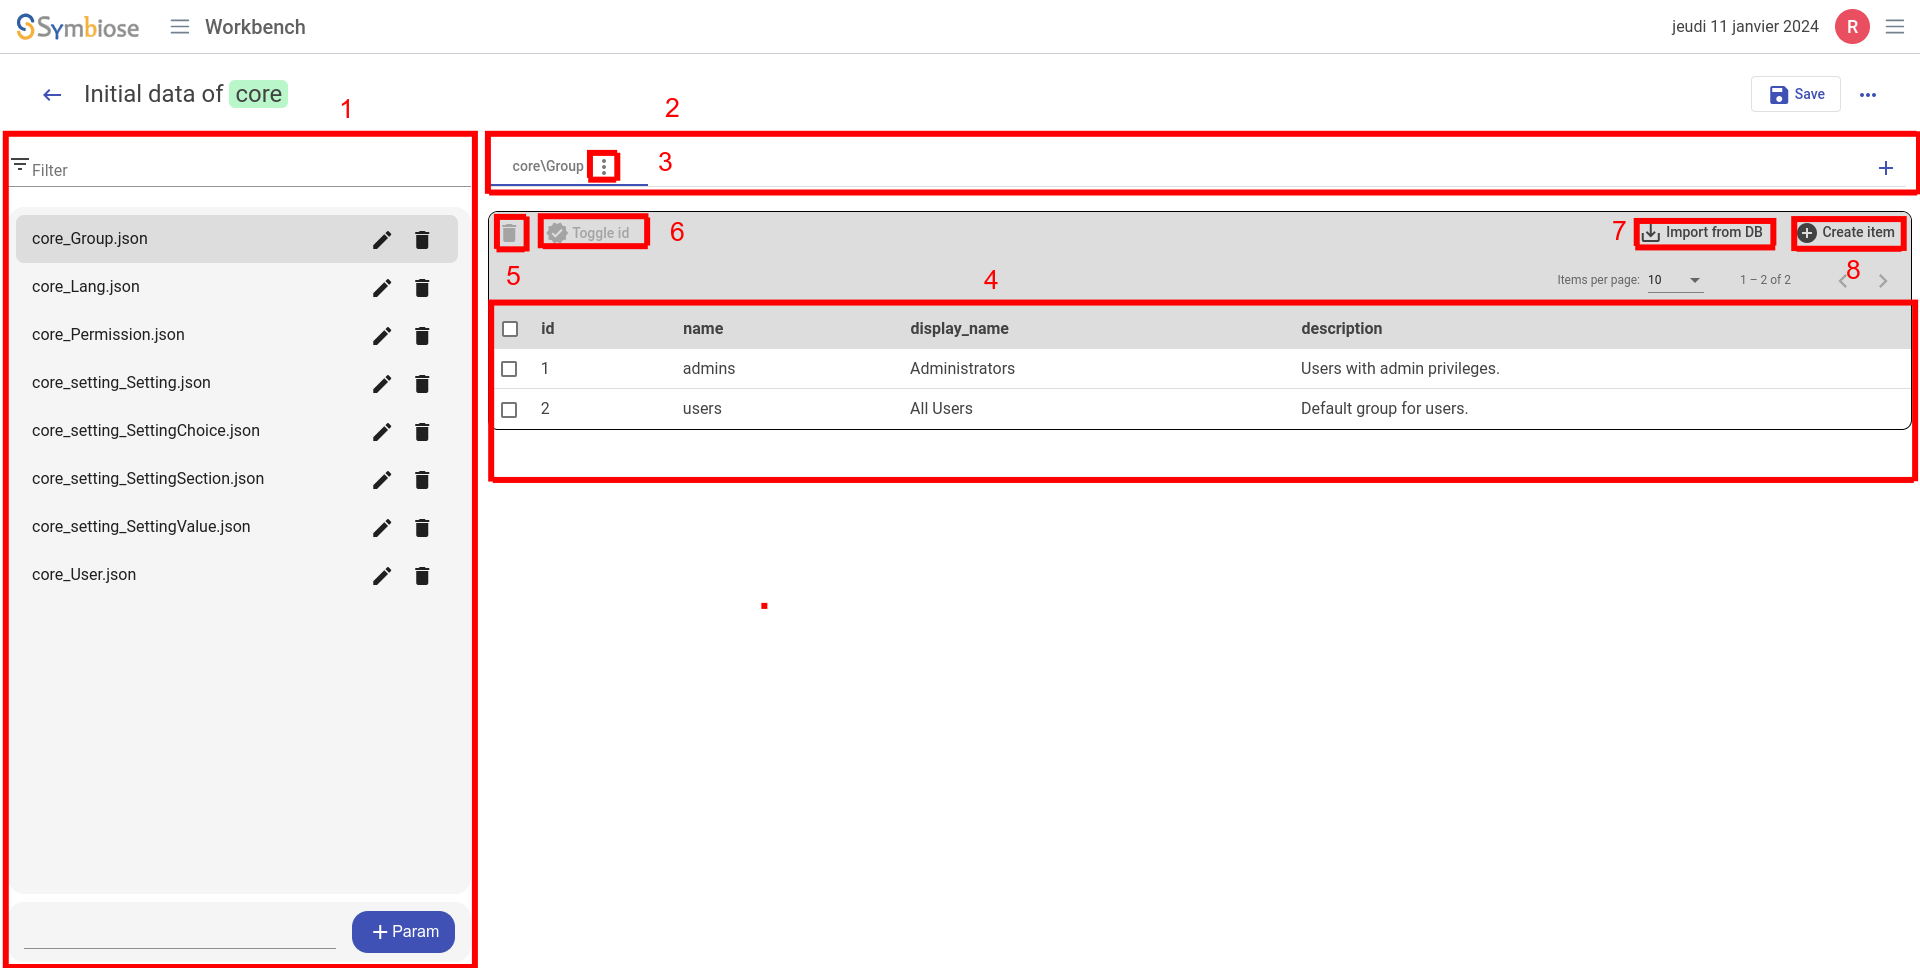
- This is the list of the init/demo files for the given package, you can navigate through them using the side pane.
- You can select the entity you want to modify its entries in a given file using the tab selector.
- This button allows you to interact with the Model properties, mostly delete the model's entry or select which languages you want to create the data for the model (uses also ISO 639-1).
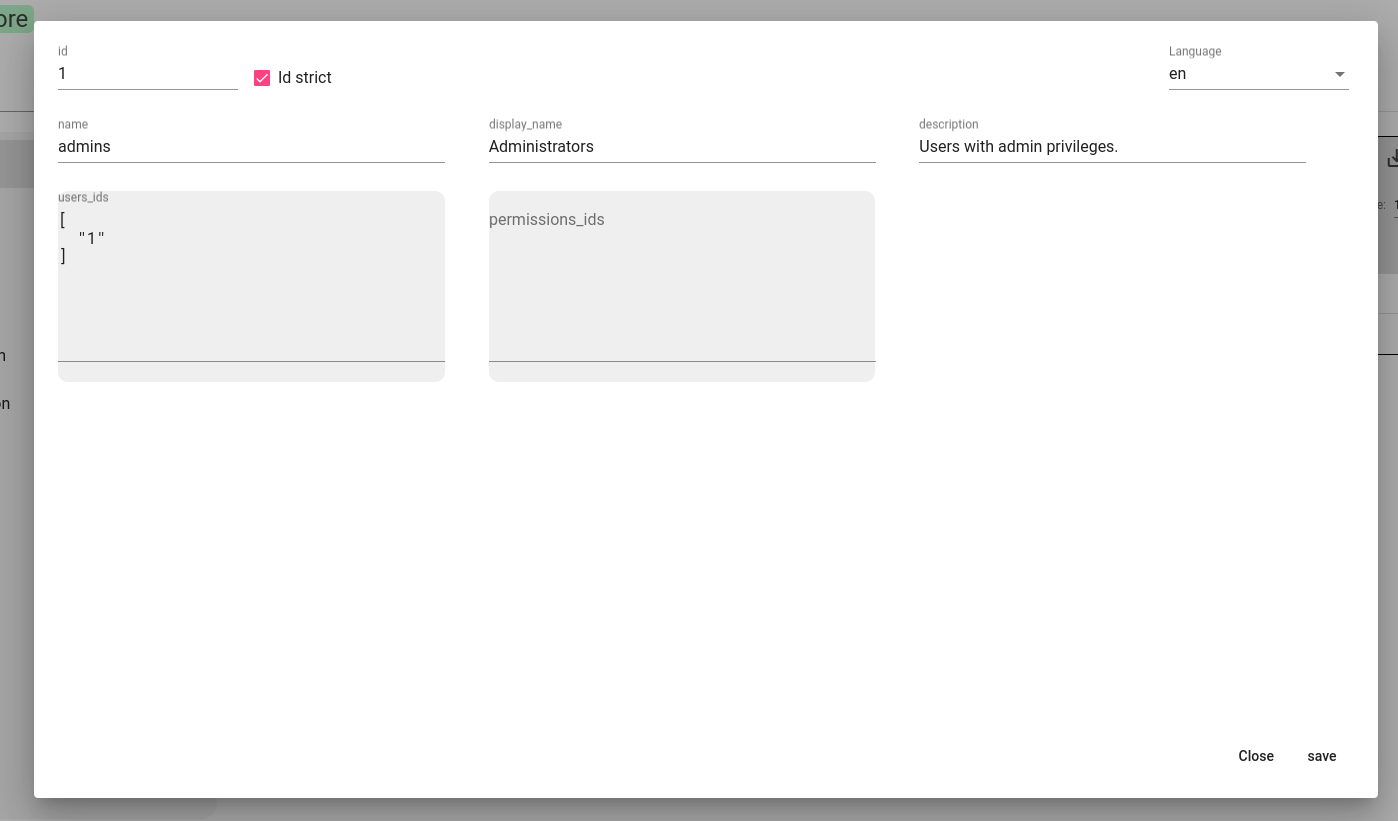
- You can visualize the data entry as a list here (uses the list.default view of the model, make sure you created it trying to display the properties before creating data). By clicking on an entry, you can edit its values (fields that are not multilang are only editable in `en``) :
- To delete entry you need to select the desired items then click on this button
- id strict and toggle id buttons allows you to tell to the editor if the entry is bound to a specific id or not. You may uses bound id to create relations between items or if a component uses the id in a domain.
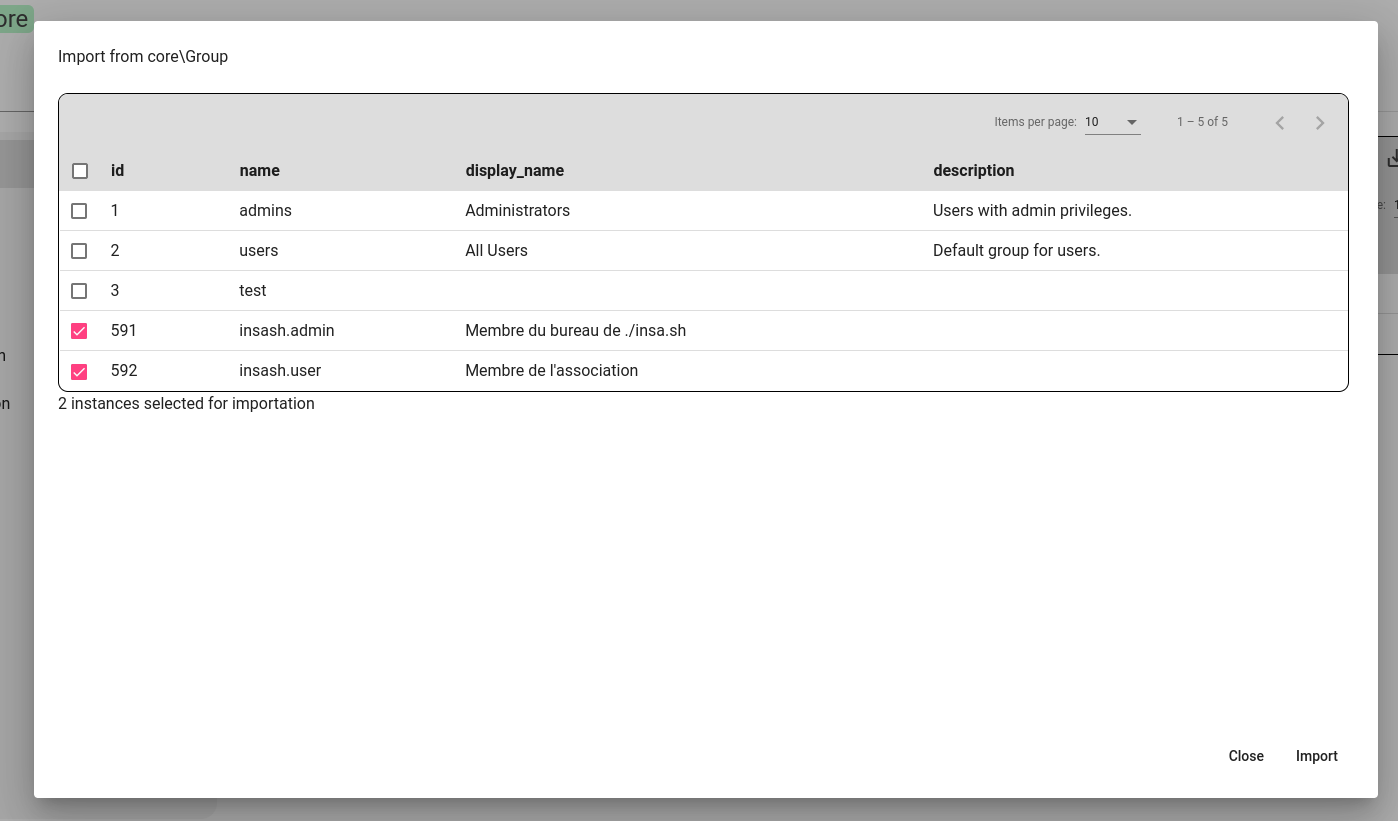
- The editor allows you to import initial data from the data of the eQual database. By clicking on this button, Workbench will fetch all the object of the Model and convert the one you select to initial/demo data
- You can create initial data entries by hand using this button. this will open the edition menu automatically on the new item.
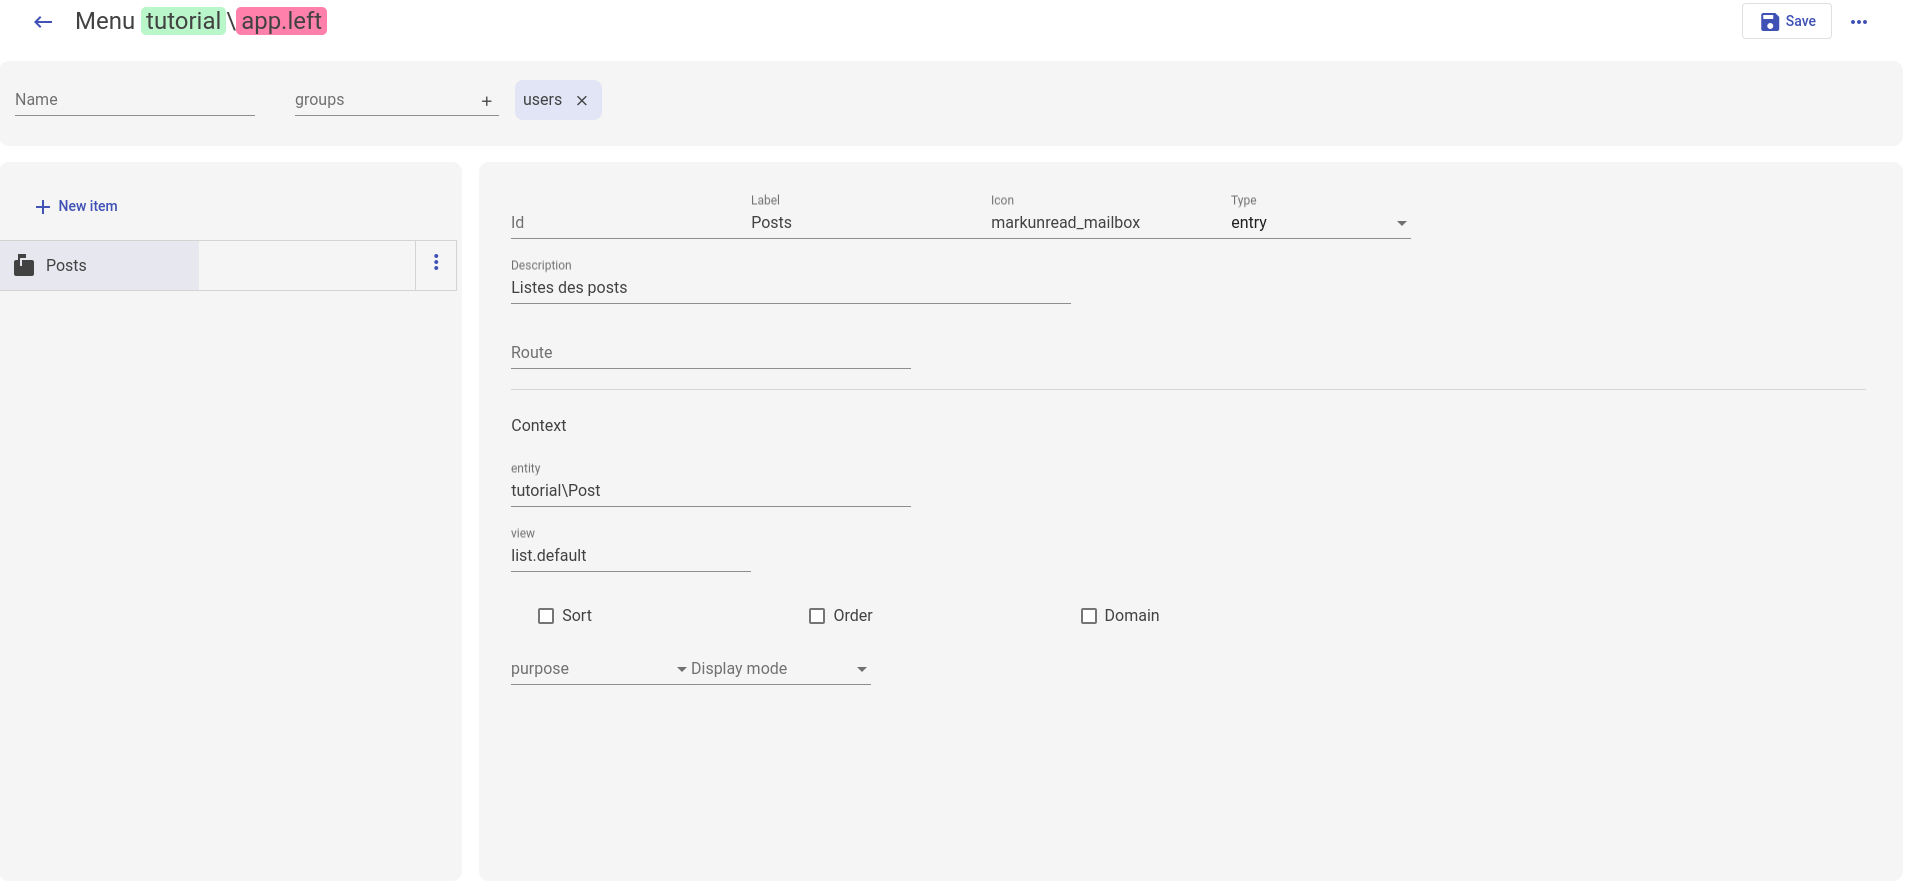
tutorial
Let's create some posts for our blog :

Initialize a package
First let's create the application for our package tutorial. Edit the manifest.json of the package as so :
{
    "name": "tutorial",
    "description": "workbench tutorial package",
    "version": "1.0",
    "author": "YesBabylon",
    "license": "LGPL-3",
    "depends_on": [ "core" ],
    "apps": [
        {
          "id": "blog",
          "name": "Blog",
          "extends": "app",
          "description": "blog",
          "icon": "ad_units",
          "color": "#3498DB",
          "access": {
            "groups": [
              "users",
              "admins"
            ]
          },
          "params": {
            "menus": {
              "left": "app.left"
            }
          }
        }
      ],
    "tags": [ ]
}
Then, let's use the initialize button of the package side menu.

- These checkboxes allow you to ask eQual to initialize the package's (and choose if you want to import their initial data) dependencies before initializing it.
- This checkbox allow you to choose if you want to import the initial data of the package.
You can initialize the package tutorial as so.
if all gone well you see this message in your package side menu

now, if you return to the /apps of your instance, you should see the blog app appear :
![]()
Congratulations ! you have created your first app using eQual Workbench.
Create and Edit Object-Relational UML
Workbench has a UML Viewer/Editor that you can access by the side menu :
The UML editor uses information contained in the models' structure to create automatically a diagram
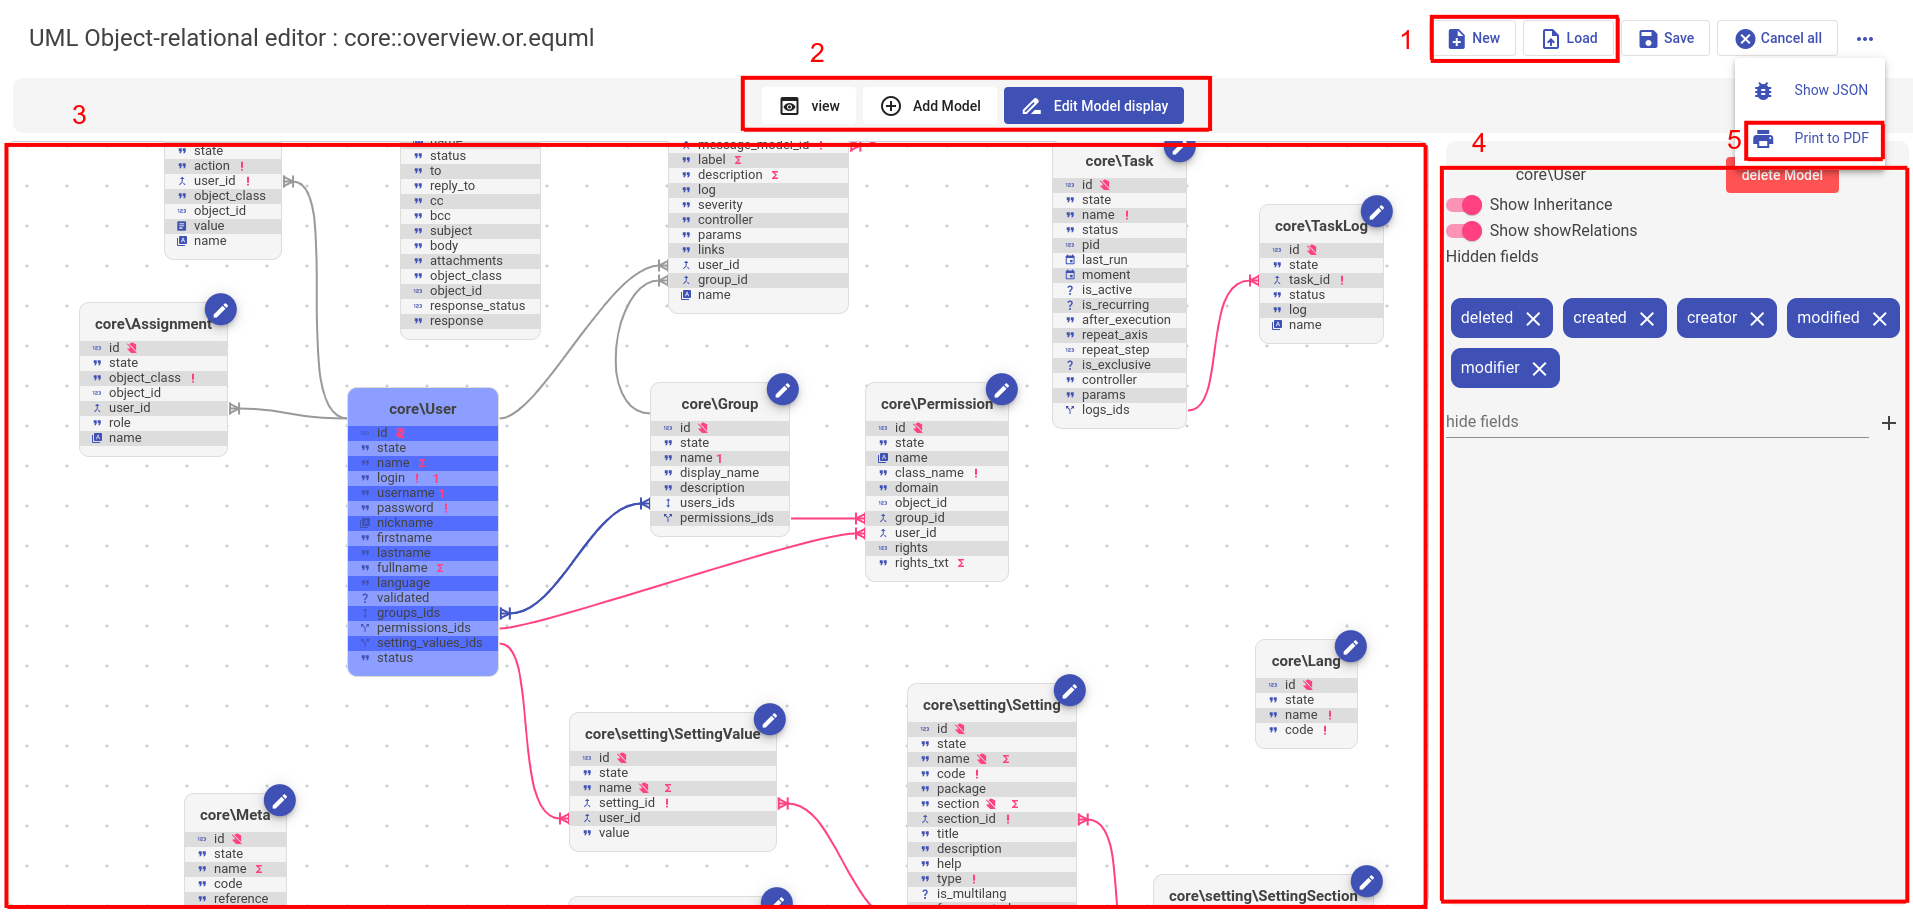
The UML editor is similar to the workflow editor in is internal working. you can switch between 3 modes (2) to create your workflows.
You can load and save UML diagrams located in the folder /uml of the packages of your eQUal instance using header buttons (1).
You can move by dragging the models in the visual representation (3) to adjust the graph
When editing a model (4) you can disable the inheritance links and relations link from this model. You can also hide fields to make the UML more readable.
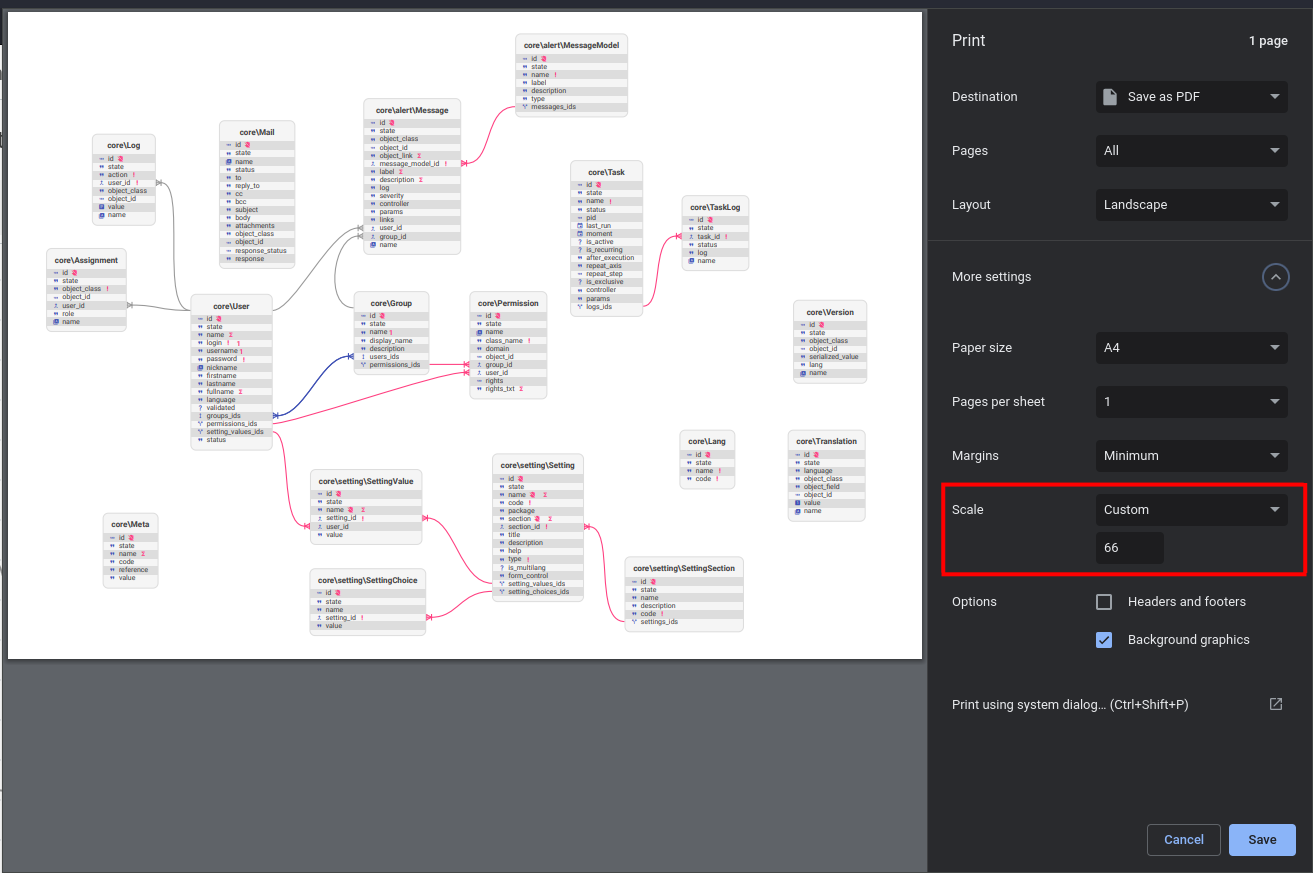
This page handles printing. you can render your UML as PDF using the button (5) or by pressing CTRL+P. Make sure that the camera is in the top left corner of the diagram and edit the scale of the print to fit everything in the page.
Adding a model is as simple as adding his name in the model list. The relations will add themselves.
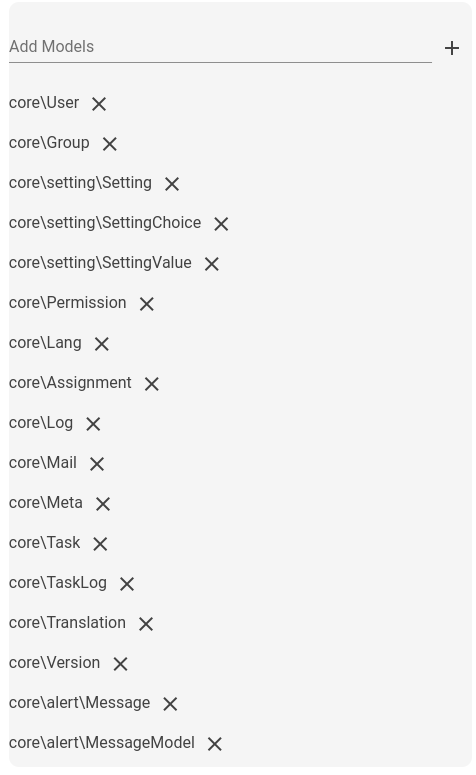
To delete a model from the representation, you can use the list of model, or select the model in the edition mode and press the delete button.
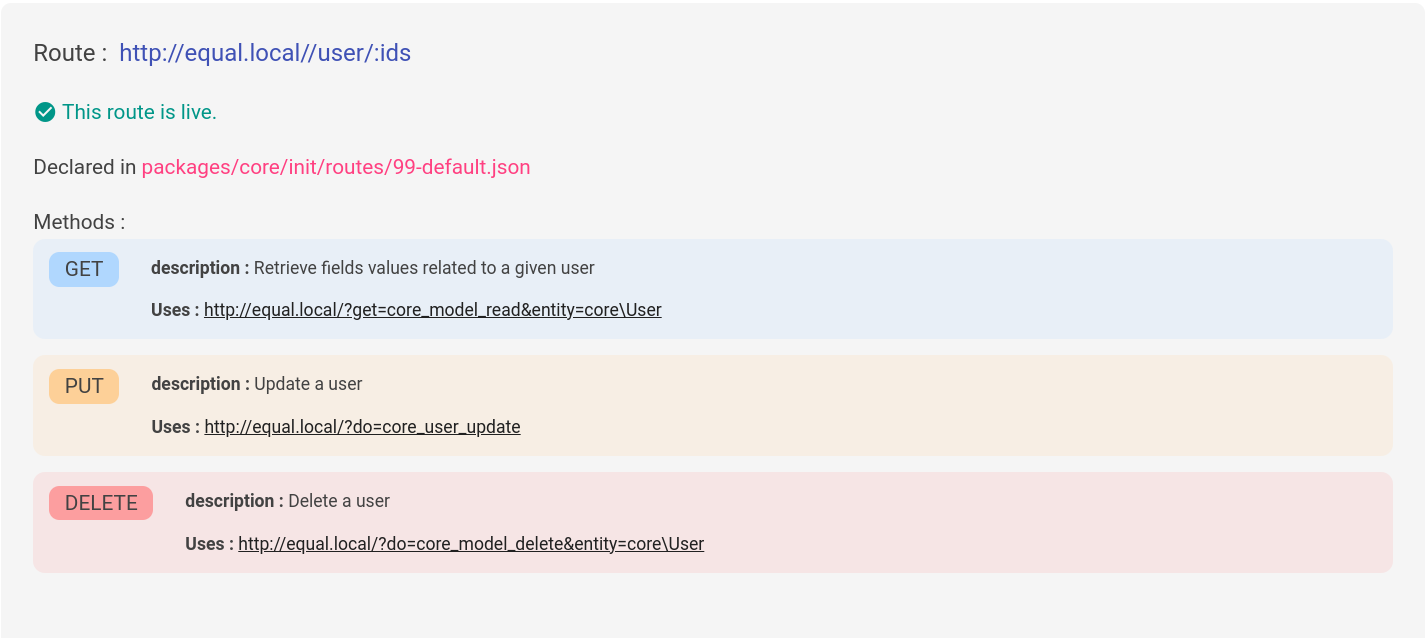
Route side menu
Route edition is not currently supported by Workbench but you can view them in the main menu and they have a side menu :